All posts filed under: Tutorials

Painting Space Marine Banner Tutorial

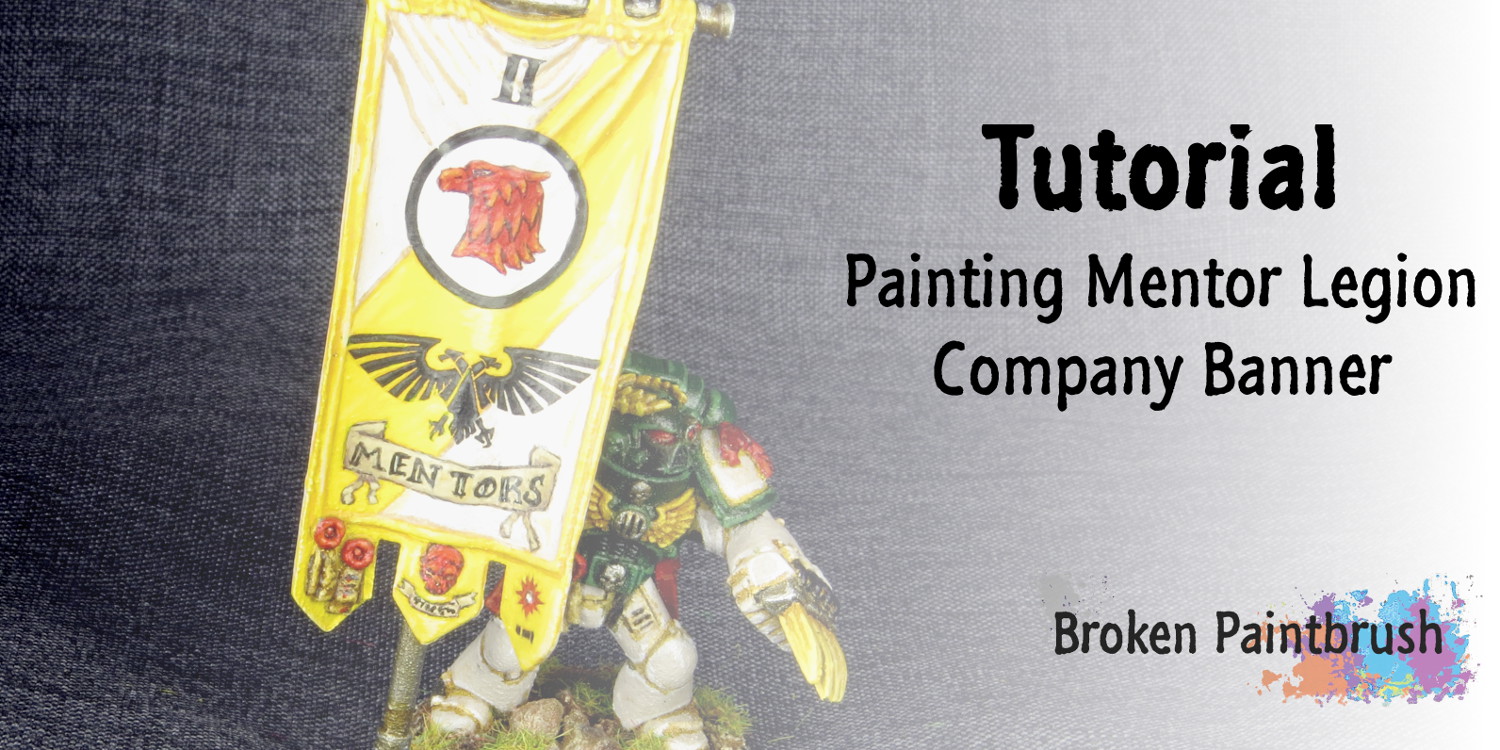
Tutorial: Painting Custom Space Marine Banner for Mentor Legion

Today I have a tutorial on painting custom Space Marine banner, in this case for my Mentor Legion but the ideas could be easily transferred to any Space Marine chapter. Before beginning, I had to first think of a design for the banner itself. I scoured the codex for ideas and did the obligatory google searches. The general idea I decided on was similar to the Raven Guard banner in the codex: I also found a handy PDF on Bell of Lost Souls (I know…) that had real basic banner designs for each company. So with a rough idea of what I wanted, I then dug through my pile of water transfers to find the starting point of each element. Water transfers? Yeah, I am still working on my freehand so I like to use water transfers as the base idea and work off of them, kind of like coloring books 🙂 Like these sort of tutorials? Make sure to sign up for my newsletter. Not only will it keep you up to date on Broken …

Hive Fleet Behemoth Broodlord

Tutorial: How to Paint A Broodlord from Hive Fleet Behemoth

So after a good reception of my tutorial on painting a Hive Fleet Behemoth Carnifex, I’ve put together how I painted the Broodlord from the Shield of Baal box. My goal with these tutorials is two fold: first to document how I painted the model so I can repeat it for additional units in the army, and second, is to give back to the community. I’ve learned so much from my fellow bloggers that I want to contribute my little piece to the greater whole. So if you are looking to paint up a Behemoth swarm, or just looking for ideas/inspiration for your own army, check out the steps below and see how straight forward it is to paint a decent looking army. Broodlord Step 1 – Primer The first step I have been doing with all my models is a two-stage primer. First I give it a nice coating of black followed by an top over-spray of white. The black undercoat provides a first level of shadows, any time I have tried to prime just …

Tale of Painters How to Paint Death Company

Good Reads 6 with a focus on painting tutorials

Now that moving is settling down and Nurgle’s plague has ravaged our house, I can get back to posting up some great blog articles I have found around the net. This week I’m trying something a bit different. Rather than using just posts from the last week I’ve been gathers them into different categories on Trello such as the one here for painting tutorials. I’m hoping this does two things: reduces the stress on me to post every week, and provide more focused reading for my readers. Let me know what you think in the comments below. Let’s start off with Tale of Painters‘ How to Paint Blood Angles Death Company. Stahly has a great, very in depth tutorial on how he painted his Death Company marines. Black can be deceptively difficult to paint so his tutorial is helpful for any black armored soldier. Next up Adam on Sprue Grey has a great tutorial on painting his Farseer. Not only does Adam give some great tips on painting the robes and free-hand designs, he also provides some background …

How to Paint a Large Base

Painting a Large Base for the Tyranid Carnifex

Another exciting tutorial for your reading and learning pleasure. This time I go through the steps of painting a large base, in particular, the large oval base the Games Workshop provided in the Deathstorm box set for the Tyranid Carnifex. So, unfortunately, I didn’t grab a before paint shot, but I used an old cork coaster to create some rock clusters around the base, including two that I planned to have the Carnifex mounted on. I then applied the great Elmer’s Glue in large splotches to apply the rest of the rock texture. I intentionally left a few areas bare of grit to create water areas. Painting the Base Layers The base was then primed with the rest of the models before given a nice heavy coat of Steel Legion Drab. A dry brush of Skrag Brown and then Ushabti Bone followed suit to provide the rock areas with a nice verity of colors and textures. The idea is to leave some of the base colors a bit thicker in some areas than others. The water areas …

How to Paint a Carnifex Finished

Getting to Happy Painting Tutorial – How to Paint a Carnifex of Hive Fleet Behemoth

I have put together my step-by-step tutorial on How To Paint a Carnifex, in my case one of Hive Fleet Behemoth. For the finished gallery, check out the post here. This Behemoth painting guide would be helpful for any Tyranid monstrous creature. Step 1 – Prime I’ve gone back and forth on my projects between black primer, white primer, and even tried brown. What I have settled on is a good black coat with an upper dusting of white. This leaves all the recesses dark (which helps with painting those pesky nooks) but provides a subtle shadow/highlight to the base coats. The dusting also emphasizes the details which make it easier to apply the base colors. The Base Coats Step 2 – Base Red For the Tyranids, I used my spray gun to give a nice coverage of Mephiston Red to all the skin areas. This saves a lot of time not having to paint them by hand. I also chose red over the base blue of the carapace because the blue covers red much easier …

How to Weather Wheels and Tires

How to Paint Ork Trukk Wheels

Over the years I have been painting, I love coming across a tutorial on something I haven’t done yet and gleaning just a little bit of information off of it. So here is my second how-to of the year – following up on my Ork Warboss – and a chance to give a little something back t0 the community. I have another tutorial on the rest of the Trukk, but here I want to focus on the wheels. As you can see below, I kept the wheels, crew, and wrecking ball separate from the main truck body to make it easier to paint. The crew and wrecking ball were lightly glued to scrap bases, and I found the wheels hubs were the perfect fit for the penny nails I use for pinning. Using some old corks I could paint the wheels and allow them to dry without touching any painted surface. Painting the Trukk Wheels Step 1: The Metal The wheel was left black from the primer, and all the metal areas were coated with Leadbelcher. Ryza rust was …

Painting Death Skull Warboss

Painting the Ork Warboss

For my recently posted Ork Warboss, I took a few in progress shots to provide some how-to content. I hope this post on painting a Death Skull Warboss helps get your Wagghh! going. Step 1 – White Base Coat First up is a nice, white base coat. White is nice for creating those bright blues and gory reds. The problem with a full white undercoat is that you need to paint EVERY thing, otherwise it is very stark and apparent, black base coats are able to hide this by making ‘shadows’ Step 2 – Green Skin Next up is painting the various base coats such as the Warboss Green for the skin. All the colors are kept fairly bright at this point to allow for shades that will darken the look. Step 3 – Blue Base Coat The blues were also blocked in with Alaitoc Blue, it doesn’t need to be tidy as the shades and highlights will clean up the mess. Step 4-10: More Base Coats and Wash This is where I must apologize, I skipped …

Using an X-Acto Chisel blade to remove Aquila

Removing Aquilas – Creating a Chaos Bastion and Defense Lines

Often the first step in converting, removing Aquilas and other details can help transform your miniature into other factions. When the Bastion and Aegis Defense Lines were released, I was excited that they had a Chaos Bastion kit as well. I’m sure I was not the only one sorely disappointed, and a bit embarrassed for GW when I realized the “Chaos” bastion was just the usual one with the accessory sprue added in (at an extra cost of course). Being in product development myself, it just baffled me why GW molded the Aquilas into the kits rather than having it as a glue on piece. They could have then sold Chaos, Ork, or even Tau accessory bits to glue on instead. But alas, if you want to use these kits for non-zombie worshiping factions, here is how I removed those pesky mutant eagles. The Tools First you need the right tool: the chisel Xacto blade! (more info on X-Acto knife here) I’m not sure what the blade number is for this guy but the key is the flat blade at the …

How to Paint Iron Warriors

How to Paint Iron Warriors a Painting Tutorial and Guide

The Iron Warriors were my first 40k army. I picked them in part because they had a simple painting guide int he 3rd edition Codex. Both my painting skills, as well as the hobby, have changed since then. But here is my updated guide to how to paint Iron Warriors. I’ve broken down how I paint Iron Warriors in six detailed sections on the specific parts of the model. How to Paint Iron Warriors Part 1: The Metals Following on my step-by-step paint guides for my Sorcerer and Fabius Bile I figured it was time to do one for the bread and butter of my army: the Iron Warrior. I’ve broken this down into multiple parts to give more detail in each step. So first up is the metals. This is the prominent feature of any Iron Warrior: iron/silver armor and gold trim. It is also the messiest stage which is why I always do it first. Step 1: Primer I always prime my Iron Warriors black. If anyone has tried to paint metallic over …