Latest Posts

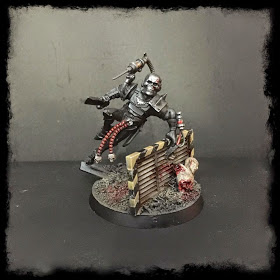
Scratch built Avesor Assassin by Henry South

Good Reads 3 – Hobby Blogs You May Have Missed

So Week 12 of 2015 is here and with it some more Good Reads that caught my eye with nifty posts.

I love finding new artists and inspiration and follow about 30+ active blogs on Feedly but am finding more and more on my Google+ and Twitter (@brknpaintbrush) accounts, so if you aren’t following me on there, hit up the link and say hi.

Ok so let’s check out some more goodness:

Converted Evesor Assassin


Scratch built Avesor Assassin by Henry South

Built and Painted by Henry South

The Evesor Assassin is such a scary idea that it is such a shame GW hasn’t gone back and updated the Assassin line or updated the rules like did in third addition. I found Henry South on Google+ where he posted a few WIP shots of his crazy bits bash of the Assassin and posted his finished piece to his blog 4gotowar.blogspot.com. Check it out, you won’t be disappointing.

Egyptian Themed AdMech


Adeptus Mechanicus "counts as" Sentinel by Dameon Green

Painted by Dameon Green

Last week I posted some cool Greek flavored Space Marines, this week we have an Egyptian themed Adeptus Mechanicus Sentinels. Not only is the sandstone look a cool alternative to the AdMech red, but very well executed. Check out his AdMech section for some more WIP shots that show all the cool bits he used to build this uniquely awesome model.

The Golden Throne


Built and Painted by GMM Studio

Built and Painted by GMM Studio

There have been many takes on the 40k historic moment of Horus and the Emperor dueling, but I have never seen a take on the actual Golden Throne until GMM Studio posted their completed masterpiece. This thing is beyond belief and staggeringly huge (find the little guard at the front door). I’m a bit envious of all of you who got to see in this at Adepticon this week.


I hoped you enjoyed Good Reads 3 and as always, if you have some more cool reads, post the link below to help spread the word on your fellow hobby bloggers.

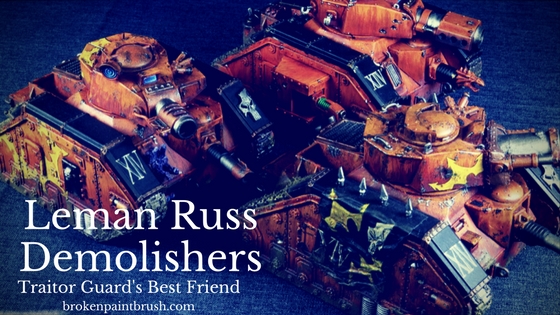
Leman Russ Demolisher Squadron Showcase

Traitor Guard Leman Russ Demolisher Squad

Who doesn’t like a tank with a big gun? And what is better than one tank with a big gun? A whole squadron of Leman Russ Demolisher tanks with big guns!

Leman Russ Demolisher Squadron Showcase

One of the reasons I wanted to build up an Imperial Guard (Astra Militarium?) army was because I have always been a bit of a tread-head, so adding some hard hitting Demolishers was a no brainer.

Traitor Guard Leman Russ Demolisher Squad

I built all three of these tanks from the older Leman Russ kit with only one being the old, out of production, metal Demolisher cannon. The other two were built from other bits and pressed to service. To keep them uniform, all three have track guards which help signify their higher armor value and my army badge on the front.

Traitor Guard Leman Russ Demolisher Squad

The metal Leman Russ Demolisher was my brothers from his old Catachan army from somewhere in middle school. The traitors seized it and stripped it of its honor.

Leman Russ Demolisher

It originally had the sponsons, but they had broken off over the years. So to hide the damage, I covered the sides with a banner made from tissues and glue.

Traitor Guard Leman Russ Demolisher tank

The army badge comes from the old Dark Elf Spearmen box, which is a shame since they both replaced the kit and are killing off the army. So I may have to find some spares before too long. Anyone have a bag full of these bits perchance?

Traitor Guard Leman Russ Demolisher tank

The banner was my attempt at free handing both the army badge and the chaos star on to a very wrinkly mess. While I am happy with how it turned out, I think the yellow needs a bit more contrast to make it stick out and define the lines.

Traitor Guard Leman Russ Demolisher tank

Leman Russ Demolisher #2

The second Demolisher is a normal Leman Russ turret that I shortened and gave a targeting bit on the side. It also received some demon possession treatment out the front door.

Traitor Guard Leman Russ Demolisher tank

On the Leman Russ tanks, I attempted to follow Forge World’s method of painting the Chaos Stars, which I learned using Dave Taylor’s fantastic tutorial.

Traitor Guard Leman Russ Demolisher tank

While I haven’t built any of the new Demolisher kits, they look amazing and add lots of variety to the tank.

Traitor Guard Leman Russ Demolisher tank

Leman Russ Demolisher Command Tank

The third Demolisher acts as the squadron leader as denoted by both the dragon head on the lascannon (chaos classic) and the plasma cannon sponsons, which are actually from the original metal version. The weapon for this tank is from the Baneblade‘s Stormhammer turret.

Traitor Guard Leman Russ Demolisher tank

The Stormhammer turret does look a little big, but then again the Demolisher Cannon is a big gun!

Traitor Guard Leman Russ Demolisher tank

As a squad, I feel the small variations in the turrets and side decorations help them stand apart, but the orange and tread plates bring them back together.

Traitor Guard Leman Russ Demolisher Squad

At some point, I need to paint up four more Leman Russ tanks to finish out the Emperor’s Fist Warsmith’s Fist formation with ten battle tanks! The other squad is three regular Leman Russ tanks.

Hmmm, let me go back and look at my closet of doom backlog….

Traitor Guard Leman Russ Demolisher Squad

Until next time fellow tread-heads! I hope you like my Leman Russ Demolisher Squad and if you happen to have a full formation posted, post a link below, I would love to check it out!

You can see the whole army on the Traitor Guard Army Page.

Behemoth Carnifex with Barbed Strangler

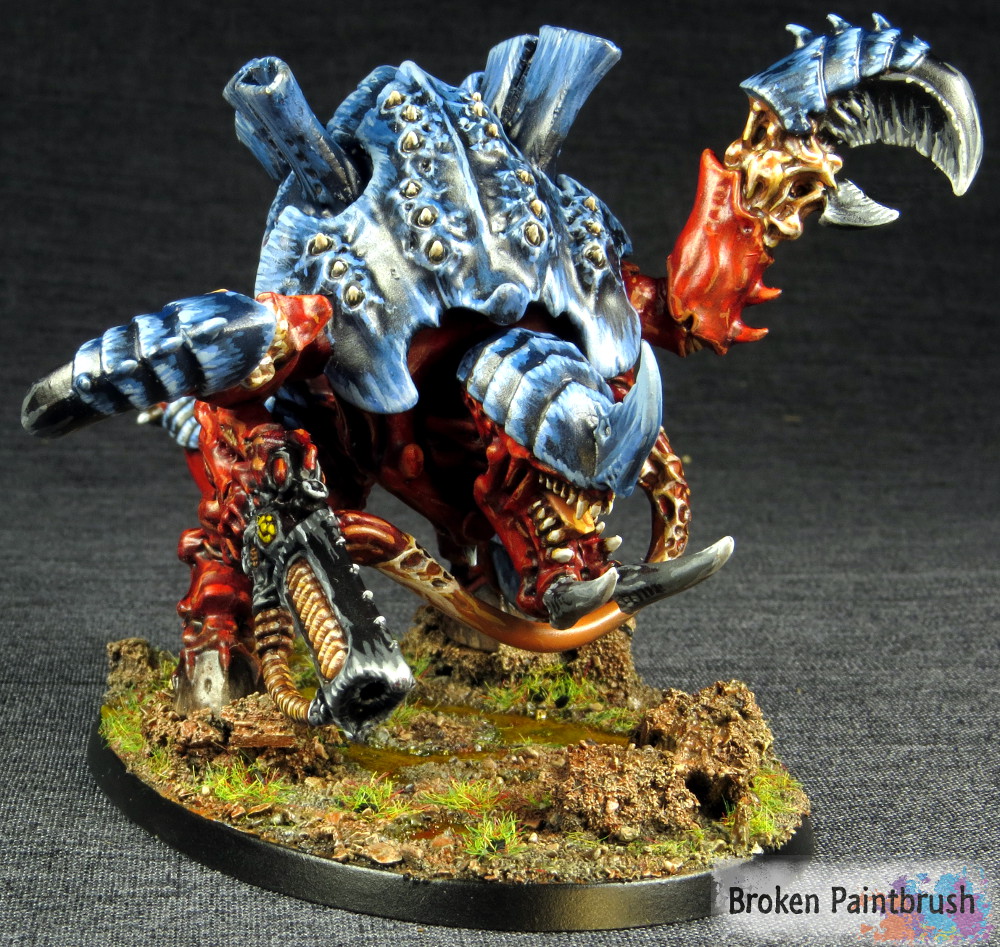
Tyranid Carnifex of Hive Fleet Behemoth with Barbed Strangler

I love painting monstrous creatures almost as much as I love painting tanks, there is just so much character, and presence in the larger models. This Tyranid Carnifex is from the Shield of Baal box – the first of the big bugs and my second Carnifex.

Behemoth Carnifex with Barbed Strangler

I painted him to be part of my brother-in-law’s Hive Fleet Behemoth so used deep reds for the skin and black-to-blue for the carapace.

Behemoth Carnifex with Barbed Strangler

Since I armed the other Tyranid Carnifex with a venom cannon and scything talons, I gave this guy the barbed strangler and tank crushing claws – in part because they look bad ass.

Behemoth Carnifex with Barbed Strangler

I decided to take the base up a notch using some of the techniques I practiced on my Ork Warboss. Using cork, I added some height. But also left bare patches in the sand to allow for water puddles.

This was also the first model I’ve bought with the new oval bases and I love it.

It gives a larger canvas for this guy to walk on without sticking out to the sides too much. If you are interested, I wrote up a tutorial on how I painted the base including how I made the water-like effects.

Behemoth Carnifex with Barbed Strangler

As I painted this guy, I took a ton of pictures along the way. I used them to create a step-by-step tutorial. You can see how I painted the Carnifex here. I use the same technique for the whole Hive Fleet Behemoth.

Behemoth Carnifex with Barbed Strangler

To get a sense of how the background affects the overall look here is the Carnifex in my regular white lightbox. Some colors like the red stand out a bit more. But the tips of the blue and blacks disappear into the background.

Behemoth Carnifex with Barbed Strangler front on white

Let me know what you think of the Carnifex and don’t forget to check out the painting tutorial and basing tutorials for him.

Good Reads 2 with awesome hobby blogs to read

Good Reads #2 – Hobby Blogs You May Have Missed

Welcome back to another week of Good Reads. I have more hobby blogs posts from our niche in the world that stuck out to me, and I wanted to share.

Good Reads 2 with awesome hobby blogs to read

Check them out and support your fellow hobbyist and celebrate their accomplishments.

Iron Snakes

Space Marine Chapter Iron Snakes by Marc

Iron Snakes by Marc

M4cro has painted up a full squad of Iron Snakes he has called Squad Lakodeme. Some fantastically painted shield designs and a cool story he is telling with these Marines. I’m a big fan of the Spartan look on Marines and especially Marines with shields, and these guys fit both bills.

Custom Built Razor Back Turret

Scratch Built Razorback Turret for Space Marine Tank by D Powers

Razorback Turret build by D Powers

Typically a Razorback doesn’t get anyone excited, but D  Powers scratch built his turret with some crazy, ornate detail and an exposed Techmarine who is just looking like a boss. Also, check out his armies back story, I love when people expand upon little tidbits or create whole new stories from the lore.

Building a Bridge

Scratch Built Bridge by Stephanie

Built and painted by Stephanie Young

How many remember your first hobby projects? How about your first foray into blog posting? Stephanie Young has not only jumped into both with some great progress but decided her first terrain project would be a scratch built a bridge over a river.

Custom Gun Drones

Custom Servitor Gun Drones by Steve

Servitors Built by Steve Wer

Steve Wer took his extra bits and fiddly-what-nots and built some creepy Sevitors. Just goes to show that you don’t need a whole lot to expand parts of your army – and why you should never throw bits away.

Wrap Up

If you found any other cool posts from hobby blogs in the last week, drop them in the comments below, I love to find new people to follow and be inspired by the massive amount of creativity in our hobby.

Why the End Times will Save Warhammer Fantasy

Disclaimer

First a bit of a disclaimer: I haven’t played Warhammer Fantasy Battles in years, around the release of 8th, so yeah that long. I also haven’t bought any of the End Times books – $50 really GW? Fortunatly there are plenty of others who have posted updates for the rest of us like Mengle Miniatures’ State of the End Times.

Oh and this may be a spoiler: but the current Warhammer Fantasy World is ending – didn’t even need to read the books to see that coming. But why am I excited? I believe that the reasons I haven’t played or bought anything related to the fantasy line in years is exactly why Games Workshop is doing such a drastic, and risky, move.

The Story

Before the End Times

One of the biggest reasons why I love the 40k universe and had issue getting into the fantasy as much is the story. Rules wise I actually really like fantasy and preferred parts of it over 40k, but why would my Lizardmen, on another continent, be fighting some Ogres in a desert? In 40k everyone has ships, the warp can take you anywhere, and mess with time, so stories are easy to create. In fantasy not so much, especially for armies like the Bretonians who love their horses and not their boats.

Seriously, how are mid-evil armies supposed to fight across this globe

Seriously, how are mid-evil armies supposed to fight across this globe

Sure GW has tried to overcome this with the border princes, or campaigns – but it has always felt a bit forced or isolated to a certain region.

After the End Times

So at this time it is all rumors and speculation on what will actually happen after the end times from bubble universes, to a whole new world(s) story arc to just starting over in time. Craziest of all would be combining it somehow with the 40k world – but would mess with things way too much.


//

Either way GW recreates the world of fantasy, one thing will be for certain: they will improve the plausibility of the game’s story. Lets take the bubble world idea, my little empire world doing its empire thing suddenly collides with another bubble full of orks. Crap, now we need to defend our little bubble and maybe even scavenge a bit from theirs. And off the bubbles go to collide into others. Perhaps even the space lizards can pull bubbles together to create little bubble groupings. Infinite stories are now possible.

The Business

Before The End Times

You just have to walk into a GW store to see where it is making its cash: Space Marines. It seems like 80% of the shelves are allocated to 40k, and of those, half are of one space marine chapter or another. Why? Because Games Workshop sells a crap ton of Space Marines. They have an epic story, they have options to create your own chapters, and they are everywhere.

102_0015

Now look at the fantasy line. While there have  been some fantastic (and some ridiculous kits) being release for the End Times, many of the armies have never been that exciting. In part because of the story and background, but also because there wasn’t the room to create your own part of the world. Playing Empire? Ok, chose which of the limited number of factions would you like to paint it as. Wood Elves? Oh, those guys never leave their forests here in the middle of no where and are all painted like this.

After the End Times

Here is where the business arm of Games Workshop can keep it cash flowing – and admit it, we all want GW to keep the cash flowing and staying open so we can keep building and painting their miniatures and playing their games.


//

Going back the bubble universe idea, if their are all sorts of bubbles with a mish-mash of peoples populating each it opens an infinite number of options. No longer is the design team limited to a historic back story of a faction, but instead can create all sorts of spin offs. I’m a big fan of the Bretonian heraldry, but not so much the lack of war machines, well now GW can come out with a crazy mash-up of the mid-evil French and the mechanisms of the Dwarves – and no one can complain. Why? Well if you want to play a ‘true’ Bretonian army, you just don’t take the new things.

Whats Coming Next

While many die-hard fantasy players maybe waiting in anxiety and already hating the idea of 9th edition, I’m excited for the possibilities that Games Workshop is creating. Sure, some of the ‘standard’ armies will probably disappear as we know them, I believe it is for the best. As a hobbyist, this will mean new units and crazy contraptions, and ways to create your own army. As a company, it means GW can stay open and keep producing the Fantasy line rather than shuttering it like its other smaller games. As a player, it will also create new opportunities to improve upon the rules and options for 9th edition.

So my take is bring on the end of the End Times and lets get started with the fresh start! Don’t agree? Well post your thoughts in the comments below to start a discussion.

Acrylic Flow Aid

Cool Tools: Flow Aid Medium for Custom Washes

I love using washes. Nearly every army I paint involves a black or brown wash. In the interest of saving a truckload of cash on these bottles of wash, I tried making my own using varnishes, soaps, and acrylic medium but they all acted a bit funny – and nothing like the GW washes. In the end, I bought a couple of bottles of Vallejo washes($8 on Amazon), but I was still trying to experiment, so I also grabbed a bottle of flow aid.

Acrylic Flow Aid Flow Aid medium

This is a transparent medium similar to GW’s Lahmian Medium except it has some extra magic that breaks the surface tension and allows the paint to flow much easier. Surface tension [Wikipedia] is the physical attribute of liquids to cling to things rather than flowing freely.

When using a wash, the surface tension of the acrylic paint – along with its thickness – keeps it in a little droplet of pooled paint. Releasing the surface tension will allow it to release and flow about – what you are usually looking for in the shade.

I have found two great uses for the flow aid medium so far:

Economy Washes

The first is to make washes on a much larger scale using tubes of basic acrylic paint you can get at a paint store. I used these to paint my Pegasus Buildings – something that would have taken about 20 bottles of Earthshade to complete.

Improve Washes

The second use for the flow aid is to improve the flow of current washes if you want it in the recesses. When I’m using washes, I am either trying to cover the whole model to create overall shading, or I want to create a black-lining effect by emphasizing the recess between two colors (think the trim of a shoulder pad). Adding a few drops of the flow add to a wash helps it sink into the recesses even more rather than pooling on the surface.

A 4 oz bottle of the Liquitex Flow Aid (which is huge for what we need it for) is only $9 on Amazon.

Good Reads – Blogs You May Have Missed – 2015W10

I follow a lot of hobby blogs, and while there is always a great slew of content that comes through my feed reader, there are usually a few that stand out for me. I’m going to call these Good Reads because trying to do a top 10 of the week, or my favorite posts never end well. So instead I will pick a few posts that I thought had great content or inspirational work and provide a curated list for you.

So for the 10th Week of 2015 here are some good reads:

Painted by Dave Taylor

Robot Painted by Dave Taylor

First up is a cute little robot painted by Dave Taylor, well little may be a wrong adjective as it stands as tall as his Thallax. And yes, I may have accidentally called it a rust bucket in the comments, those leg parts are brass – hard to see on a small phone screen.


Painted by Kamui from Creative Twilight

Rebel Grot by Kamui from Creative TwilightKamui from Creative Twilight has finished up a great custom built Grot Commissar if you haven’t seen his Rebel Grot army you should check out all the custom work he has done.


WIP Princess Painted by Klaus Fischer

WIP Princess Painted by Klaus Fischer

If you guys haven’t seen Klaus’ incredible scratch built work, you might end up spending hours on this guys site. His latest work has been showing us the progress on his Princess of the dragons. Everything on her is hand sculpted or plastic card and incredibly detailed.


LVO Pictures by Greggles

LVO Pictures by Greggles

So if you didn’t make it to the Las Vegas Open (neither did I), Greggles (or Greg) has you covered with about a thousand pictures of the armies, battles, and cool models from the event. Also, check out his Deff Dread that won him a painting prize

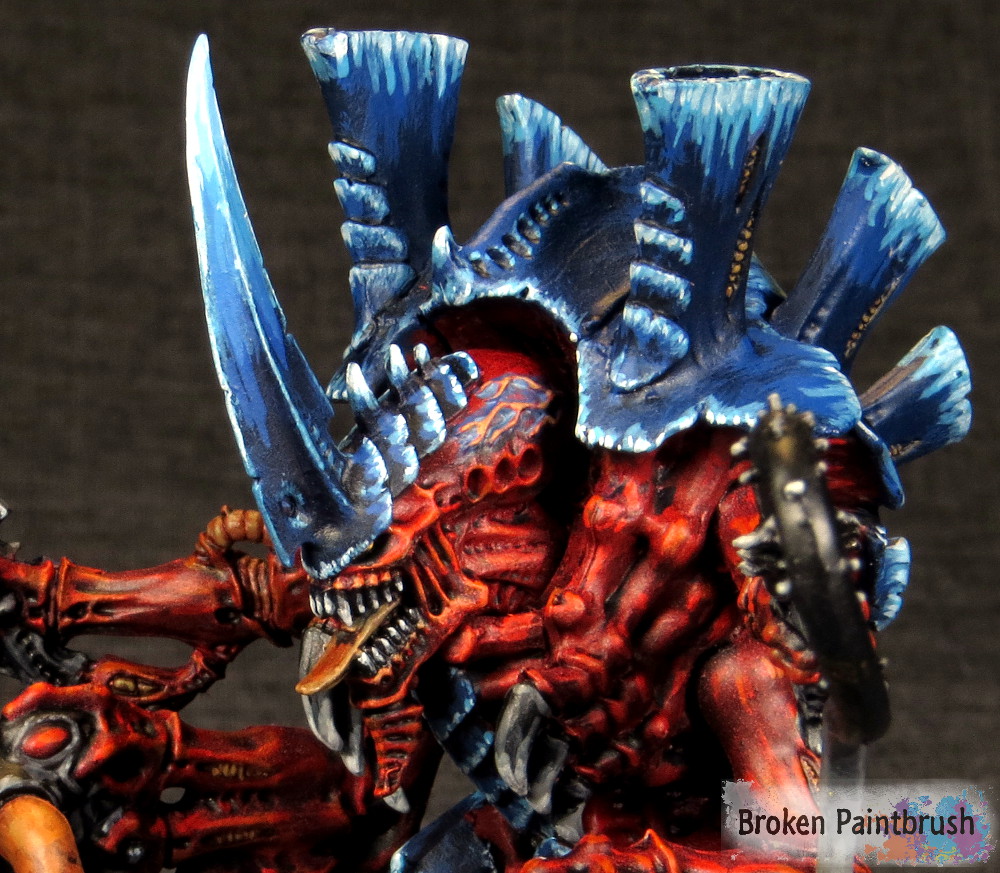
Hive Tyrant of Hive Fleet Behemoth Close up

Tyranid Hive Tyrant for Hive Fleet Behemoth

All armies need a powerful leader, and the galactic swarm of the Tyranids is no exception. So to lead my brother-in-law’s Hive Fleet Behemoth army growing on my shelf is a Tyranid Hive Tyrant – in this case, the old metal beast.

Tyranid Hive Tyrant of Hive Fleet Behemoth

Much like my other Tyranids of Behemoth, the blue carapace goes nearly white rather the GW teal and the weapons are a black to white look. This shows through on the darker background here that I made with some black/gray cloth. I tried using the basic white background, but the tips of the weapons got lost.

Tyranid Hive Tyrant of Hive Fleet Behemoth

The barbed strangler is a plastic bit from the Carnifex box to give some long range punch to the guy. It is one of the things I have always liked about GW products is that they put in that effort to make the kits inter-operable to give both the flexibility to bit swap but also keeps a uniform look between generations. Even when you look at the new Tyranid Hive Tyrant, the general look and feel are the same; it just contains more options.

Tyranid Hive Tyrant of Hive Fleet Behemoth

On the base is a bit of a shout out to my Iron Warriors. Fitting since a few of my terminators have Behemoth skulls on their racks.

Tyranid Hive Tyrant of Hive Fleet Behemoth Base

A close up of the face shows that I did not try too hard to blend the blues since I was going more for a gaming army and a striking contrast the blues were made pretty sharp with an only a few transitions to white. I also added a bit of blue around the head veins to highlight his mental prowess much like the Zoanthrope.

Tyranid Hive Tyrant of Hive Fleet Behemoth Close up

How do you guys like the darker background for the Tyranid Hive Tyrant? Does it help or does the fabric texture cause a distraction?

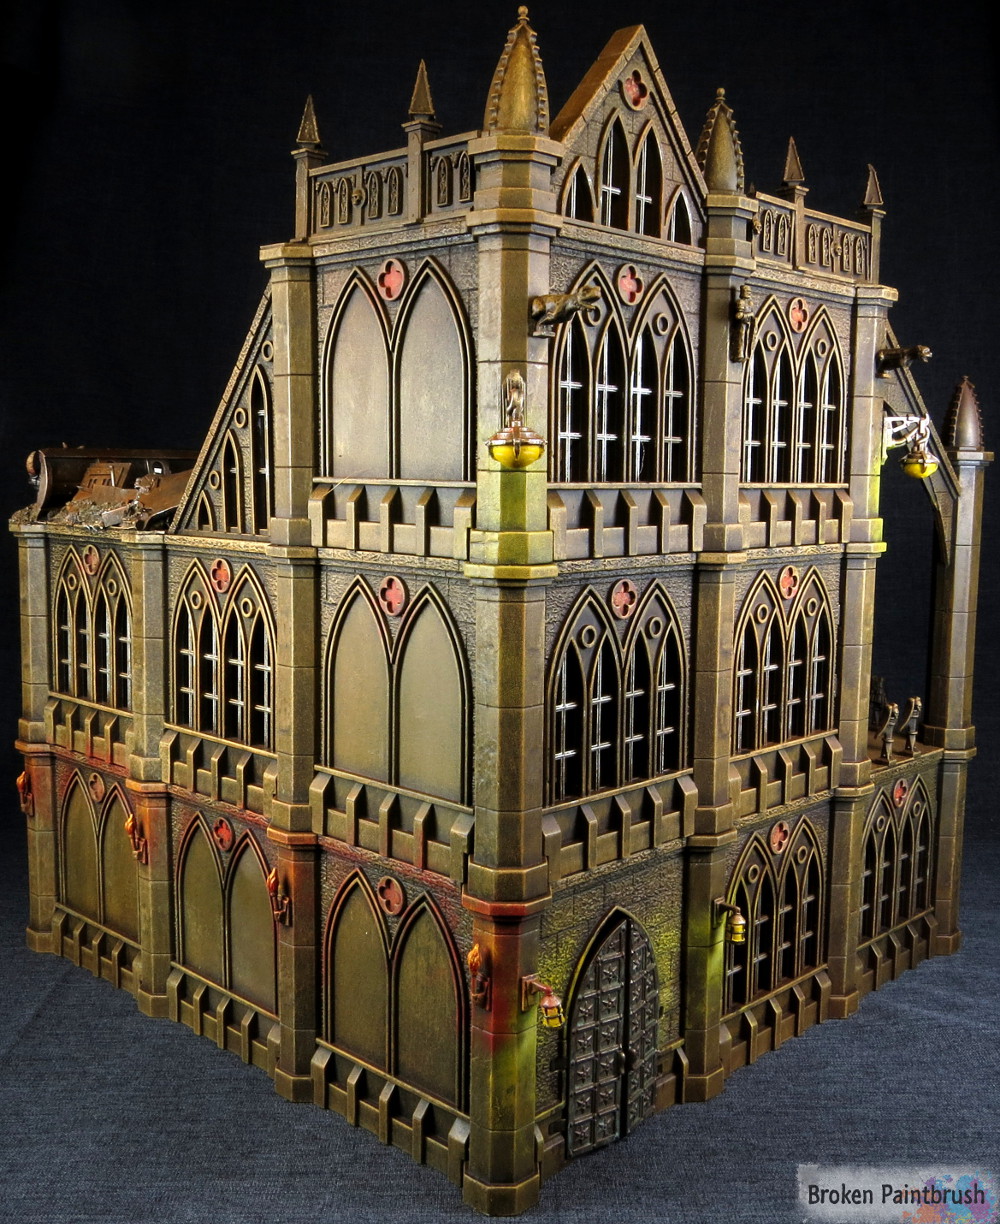
tall Pegasus Gothic Buildings for 40k

Pegasus Gothic Buildings for 40k Terrain

So when I first saw people use Pegasus Gothic Buildings for 40k, I thought it was a fantastic alternative/union with the Games Workshop kits, so I ordered a whole bunch of them to add some tall terrain for my Knight Titan to hide behind. While I finished these a while ago, I’ve been waiting for a way to take pictures of them as they wouldn’t fit in my home-made light box. After buying some dark cloth and flood lights from Home Depot, I am in business!

tall Pegasus Gothic Buildings for 40k

These are fantastic kits and only $25 or so on Amazon: Pegasus Gothic Building Kit. I think I ordered two of the Gothic Ruin sets, both of the Small Sets, and two of the Large sets which not only built both of these buildings, but I have pieces reserved for an extended cathedral, so they go a very long way. One of the neat little bits that come with the kits is a bunch of lamps and torches which I practiced my object source lighting on to mixed effect.

The front detail of Pegasus Gothic Buildings for 40k

One thing the Pegasus kits do not have though is floors or roofs. I’ve seen some excellent plastic card alternatives, but then I found Games Workshop sells their City of Death flooring kits as bits, so I grabbed four of them to help further align it with the 40k world.

A large Pegasus Gothic Buildings for 40k

I did use some plastic card for the balcony and a few other sections as it’s hard to attach the floor pieces to the walls. The broken stain glass piece was built by cutting away chunks of the way with a razor saw and breaking off extra pieces with pliers.

Pegasus Gothic Buildings for 40k Balcony

To help clean up the connection between the floor/roof and the walls I added some impromptu barricades made from scrap bits, but since I like to self-deprecate my units, I added a bit of Iron Warrior heads to the wall.

Pegasus Gothic Buildings for 40k Ruble

You can see from the back how big and open the building is. I wanted to be able to reach down into the floor level and still have models able to man the walls.

Pegasus Gothic Buildings for 40k ruin back

A look from the inside of the barricade also shows some litter from guard grunts who were trying to garrison the ruin. The green also helped add a bit of color to the building.

Detail of Pegasus Gothic Buildings for 40k ruin

The second building is a bit smaller but includes a front porch built from a spare City of Death pillar and plastic tubing.

Pegasus Gothic Buildings for 40k

I also took the eagle decorations from the Pegasus kit and made 40k double headed Aquila with a bit of green stuff. I also added some of the City of Death lighting to mix up the torches a bit.

Pegasus Gothic Buildings for 40k Window

Above both doors of this building, I added the winged skull decoration from the Imperial Guard tank kit. I also painted the doors more of a brass color with the green/teal weathering to make them stand out a bit against the stone and metal.

The front door of a Pegasus Gothic Buildings for 40k

The back of this building is much more open, and you can see the floors were made with the plastic card but used the city of death railing. I also used some u-channel plastic to create support for the flooring pieces as well as the Pegasus kit’s arch brackets to create the look of missing flooring sections.

Another Pegasus Gothic Buildings for 40k large ruin

Overall the kits are a great value, even with the pain of putting them together, filling in all the seams, and trying to hack in the flooring. If you are looking at adding some large LoS-blocking buildings for a good price, make sure you check out the Pegasus Gothic kit on Amazon.

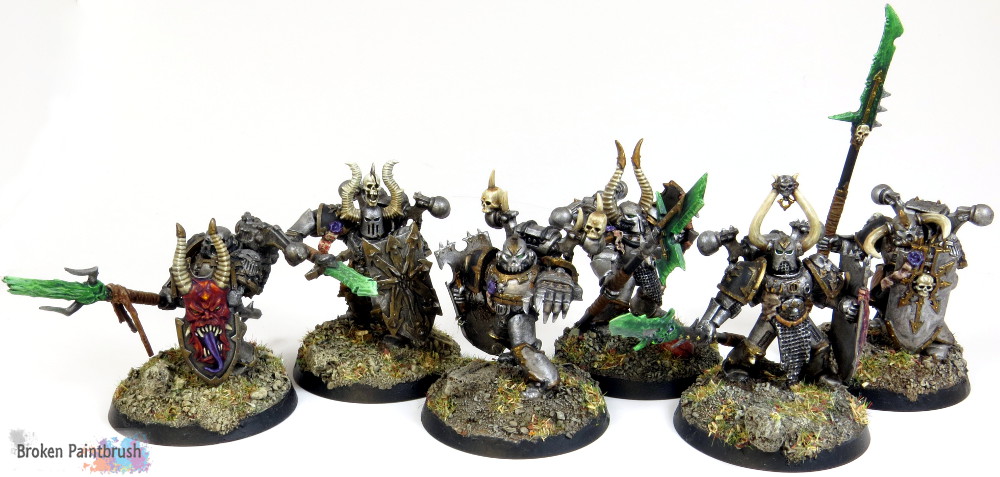
Iron Warriors Chosen Squad

Iron Warriors Chosen – The Warsmith’s Champions

When I was building out my Iron Warriors army, I wanted to create a protector squad for the Warsmith. I felt that Iron Warriors Chosen wouldn’t be full of mutations and craziness since they disdain the weakness of the flesh. So instead, I took bits from the Chaos Knights and built a custom squad with force weapons and storm shields.

Iron Warriors Chosen Squad

While this load out does not exist in the Chaos Codex, with the new flexible way Games Workshop is building out the armies, I have played these as Wolf Guard or even Honor Guard.

Iron Warriors Chosen Squad

The core of the model is just select bits of normal Chaos Space Marines, but the arms are from the Chaos Knights for fantasy. To also help set them off as special, they are on the 40mm bases as well with some added height.

Iron Warriors Chosen Squad

The selection of shields from the kit is fantastic and a good mix. The champion’s shield was actually from the Juggernaut Lord that I used for the base of my Warsmith, but since he wasn’t using it, I added it to his Champion.

Iron Warriors Chosen

As fitting of a Champion, he is pointing out his next target with a power fist. You can also see his honor roll made with green stuff pinned to his chest.

Iron Warriors Chosen

Some of the warriors also used the heads from the Chaos Knights as well which fit in so nicely with the Chaos Space Marine look. Here, I liked the chain mail on the face mask and the loin cloth.

Iron Warriors Chosen

The demon face shield is probably my favorite and adds a good deal of color to the squad. I also added a few extra strips of leather to the top of his spear to create some motion.

Iron Warriors Chosen

I wanted to make the shields and spears a part of the movement of the models and the one above really demonstrates that idea.

Iron Warriors Chosen

The shield of eyes follows up as my second favorite. I also liked the more halberd look of this weapon. At his feet is a Blood Angles helmet, a common opponent at the time.

Iron Warriors Chosen

I had also spent a good deal of time building up the bases and adding some good interest in textures and height.

I used this squad to make my painting tutorial for how to paint Iron Warriors.

Using Trello For Hobby Progress

Using Trello to Organize my Painting Hobby

The Problem

So I have noticed over the years that I am a hobby butterfly – much like many of you out there – especially the great Mordian7th :-) But as my life is getting busier between work, my son, grad school, and other projects I have been trying to get some organization to my progress. So I want to share how I am using Trello to organize my painting hobby and make sure I keep posts ready for this blog.

Using Trello to organize hobby backlog

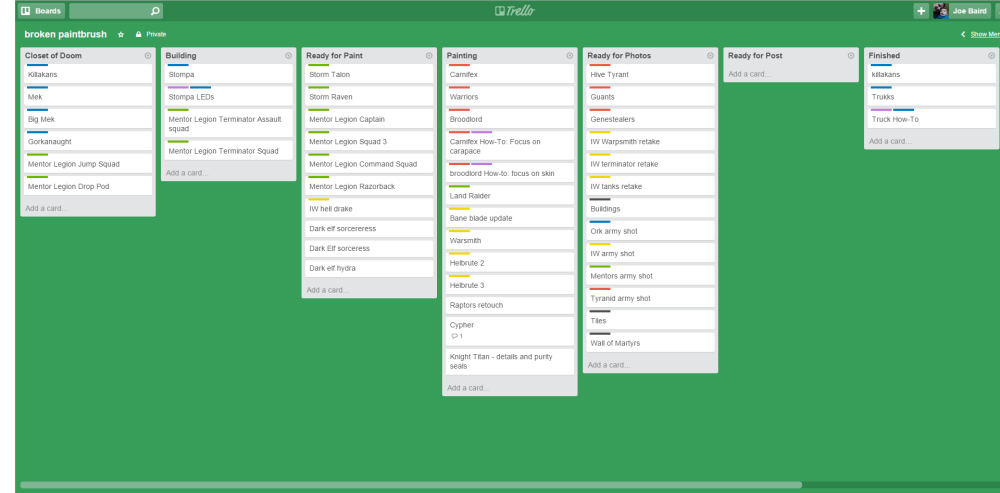
Just a small selection of my backlog

I’ve tried the excellent painting charts made famous by Mordian and Admiral Drax using Excel and color charts, but it ended up being more work for me to know when something was ‘almost done,’ ‘done,’ and posted to the blog. It apparently works for them, but I needed something a bit simpler and general – as I have multiple projects going at once (as you can see in the picture above!).

Using Trello to Organize my Painting Hobby

For some of my other projects, I started using a tool called Trello that organizes your tasks into cards that you drop into different list piles. As I work on each task, the card gets moved to a different pile until eventually it can get archived. I also started using it to organize my army build for my Ork Dreadmob.

Using Trello to Organize my Painting Hobby

As you can see, I have seven lists for Broken Paintbrush – Closet of Doom, Building, Ready for Paint, Painting, Ready for Photos, Ready for Post, Finished. Below I will share how I use each list to priorities and keep myself motivated.

Closet of Doom

I forget the wonderful blogger who coined this great term, but this is all the things in my closet patiently waiting for some love. Kits bought on a whim or were part of a combo box. The picture above does not do my closet justice because I have not yet done an exact inventory, I got discouraged after just the first 6 and moved on! I have promised my wonderful wife that I would not buy any more kits until I had a few of these boxes in the finished pile.

Building

I love building the kits – probably my favorite part which is why I have way more models waiting for paint than I have finished! I’m using this list to remember the projects that were put back in the closet (like those terminators) to make sure that I come back to them when I get a green stuff itch.

Ready for Paint

These guys are built and playable, and maybe even primed but awaiting the painting love.

Painting

My largest list for sure. This list includes all the things that have received some paint but not yet finished. There are some (such as the three Tyranid cards on top) that I am painting while watching TV. At this point I also add some cards on posts for step-by-step instructions I plan to post so I remember to take pictures along the way.

Ready for Pictures

Everything that is ‘done’ (ask a hobbyist if something is ever done!) and ready for the light box. I also added a few of my older models that I plan to retake pictures and update their posts as I have come a long way in my photo quality. This is where I can create the most for my blog as these are just waiting for pictures and posting! While I have a hard time getting time to sit and paint recently, I can, at least, work on taking pictures and keep the blog going.

Ready for Post

Once models are photographed, I need to do some quick edits and write up the post. Ideally, I would like a couple of ‘filler’ posts here so on the weeks I don’t have anything finished there could be something to share with you guys. But like I said – I’m trying to get organized here. Posts may also sit here for a few days to make sure I go back through and add links to other blogs and proofread at least once before posting.

Finished

Where you, my fine blog readers finally see the result! These are the posts I have completed and made viewable to the world, ready for your comments and suggestions. I plan to keep these up here for a while after finishing to make sure I follow-up with any comments or updates that need to happen. After some amount of time, the cards will be archived to clean up the list of new posts.

Army Planning

Using Trello to Plan 40k Army

So the other thing I just put together on Trello is my plan for my Death Skull Dreadmob, which I made public so you can copy it for your use. As you can see in the picture, the cards move from ideas, purchased (but sitting in boxes), building, painting, and finished. Once it moves to completed, I attached the final image and link to the post so I can keep track of the overall look.

I hope this helps give you some ideas on how to keep track and make progress on your hobbies, and maybe even give Trello a try (its free by the way).

What tools, trick, mental flagellates, or comments do you have on getting your projects done?

Update: Sprue Grey has a great article expanding on the painting project management that he uses.
Death Skull Ork Trukk

How to Paint an Ork Trukk

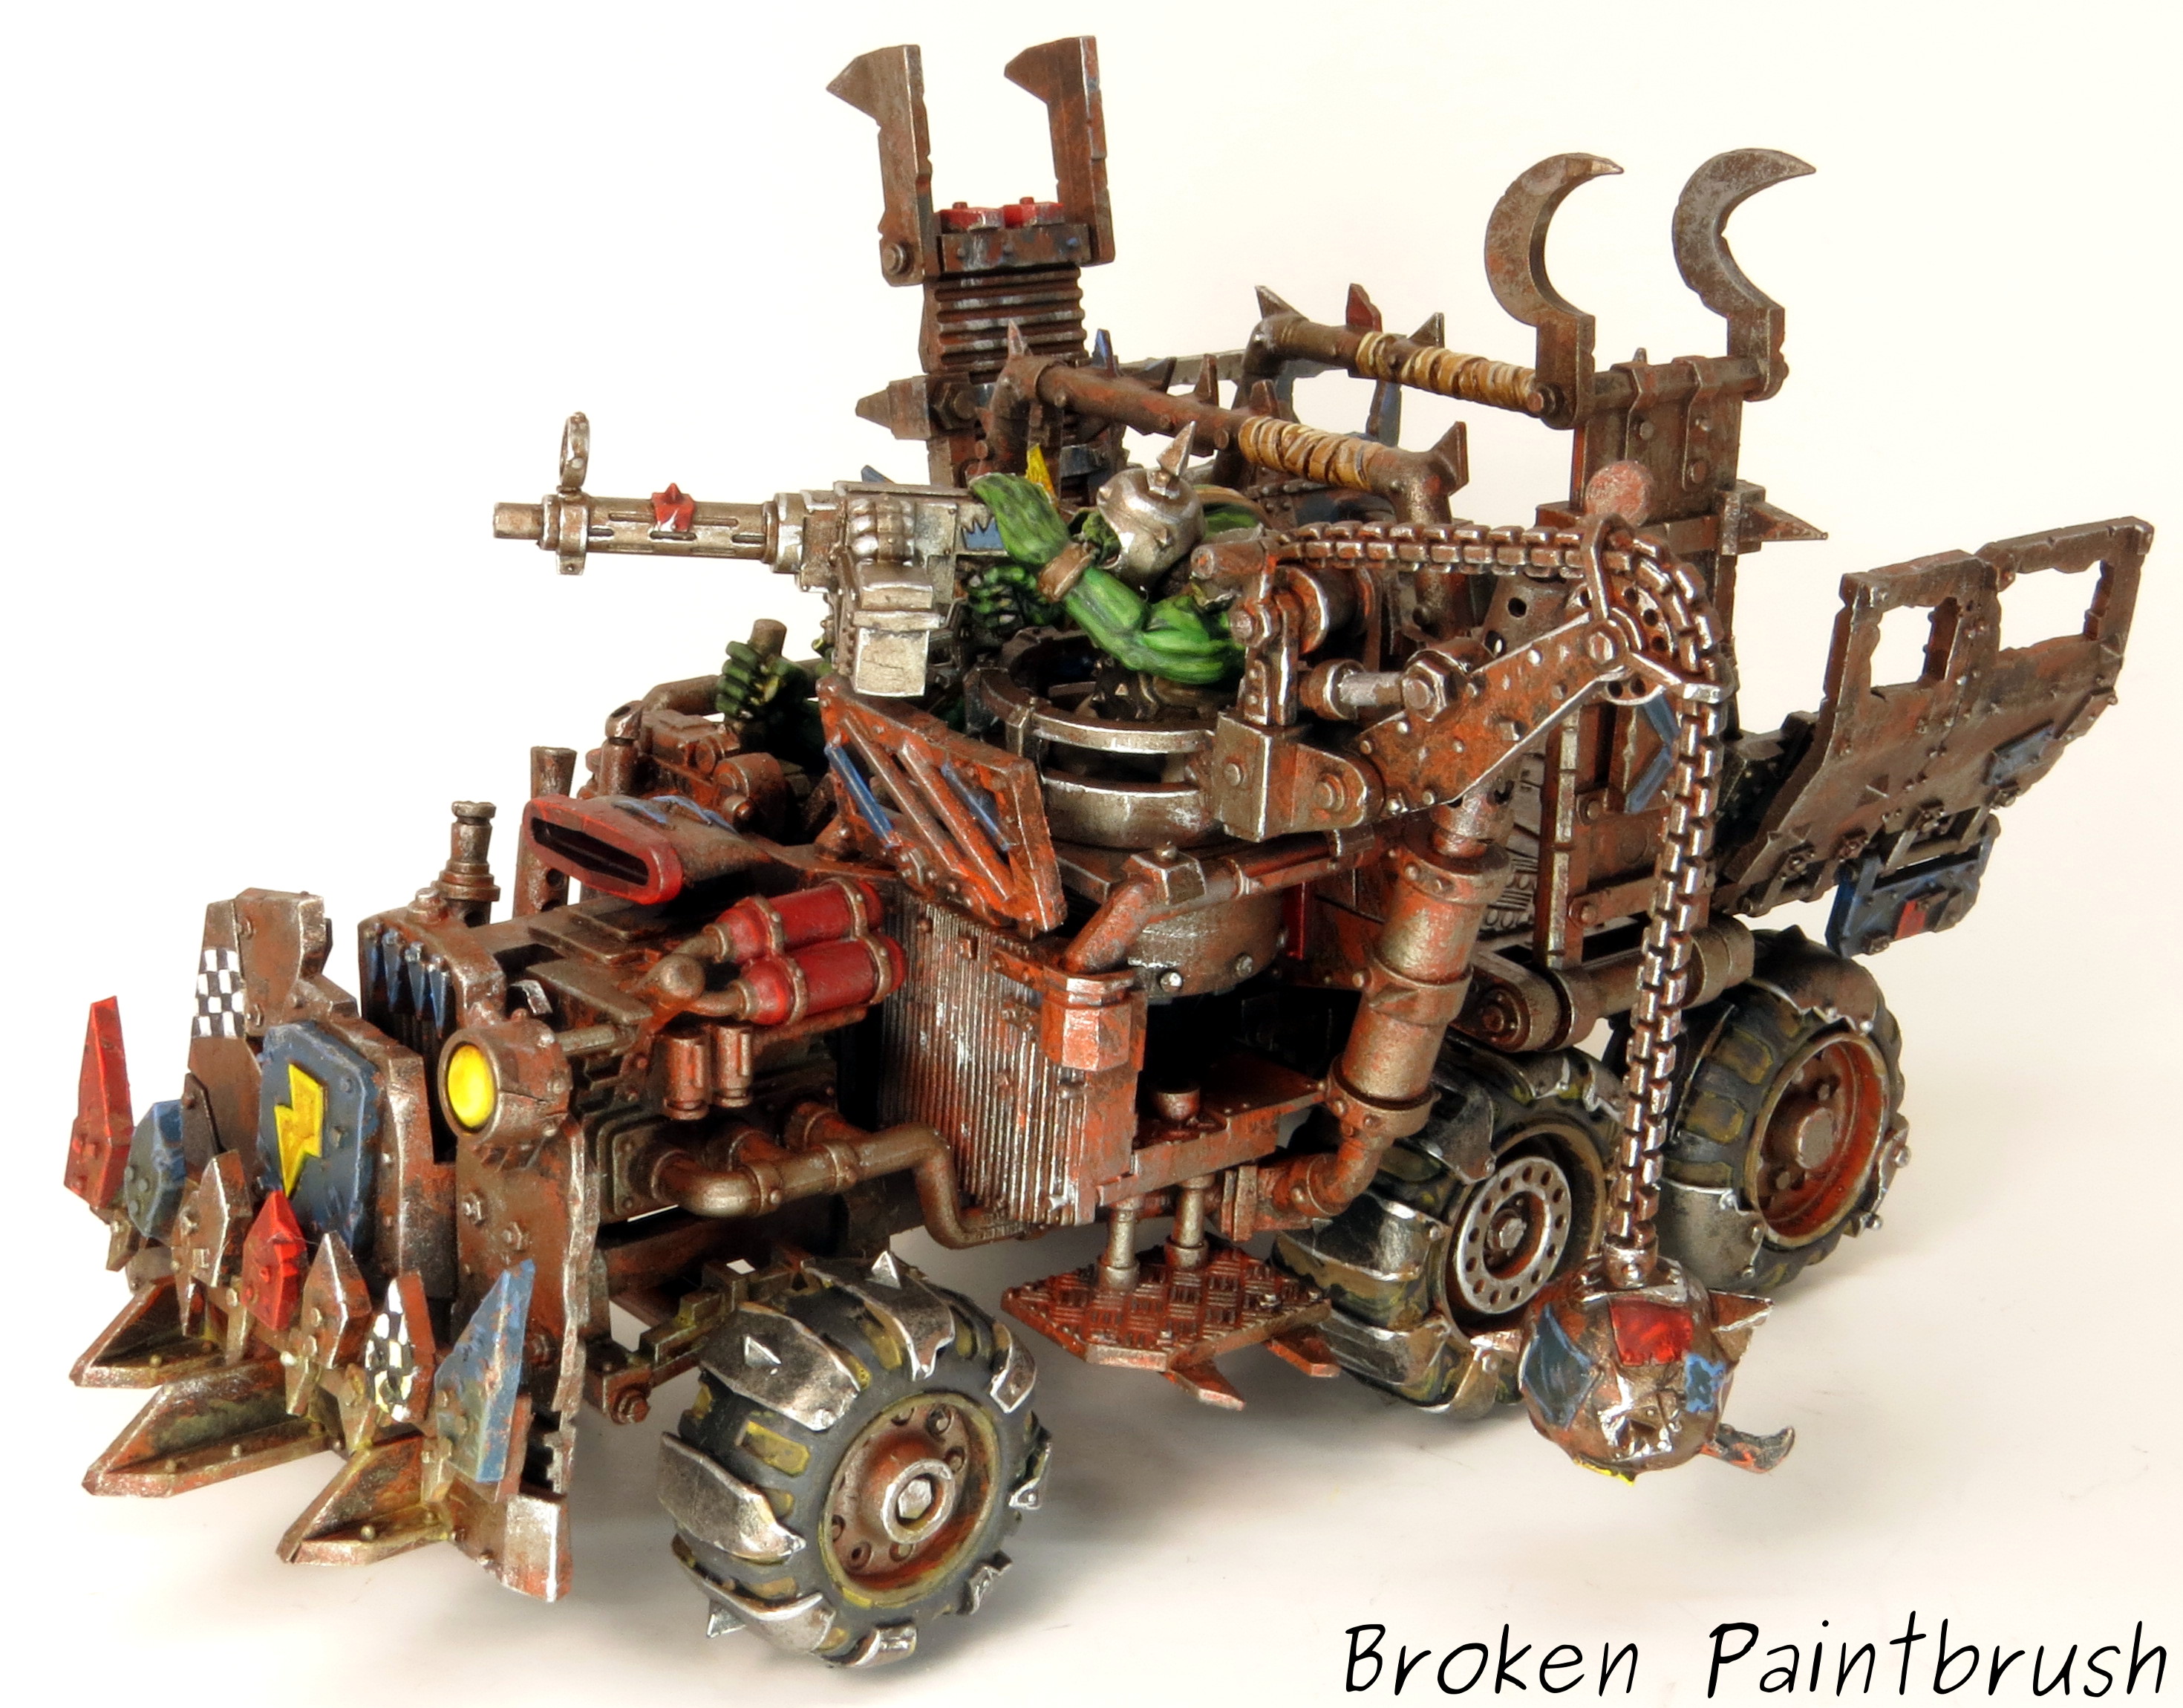
So after painting up my Killa Kans, Deffdread, and two trucks – I’ve put together my process on how I how to paint an Ork Trukk. My goal for painting the ork vehicles was to be quick, rusty, and characterful. To make it quick I used lots of dry brushing, and very little highlighting. They clearly won’t win any painting awards, but I like how they turned out and I was able to finish them quickly. The rusty metal look was from combinations of brown and orange beneath the metal dry brush and the characterful-ness is the various colored panels that make it orky.

Step 1: Brown Spray Paint.

As you can see in the photo below I left out the driver, gunner, and wrecking ball assembly. The wheels were also left of and painted separately. The model was primed with black primer to give a nice dark shadow. After drying I then hit the top side with an over-spray of white to just lighten it up a bit. The whole model was then given a nice coverage of basic brown spray paint. I wasn’t too concerned with the exact color since it would be so far down in the layers, so any medium brown spray would work.

How to Paint an Ork Truck Step 1

Step 2: The Rusty Orange.

So here is the first messy part! Using a combination of Ryza Rust, Troll Slayer orange and rust pigments I made a real, rusty, mess of things. I used a old dry brush and really tried to hit the areas that would be extra rusty, such as the leaf springs, floor boards, and exhaust stack. Other areas only received a splotch around rivets, cracks, or panel lines. The idea is to still let some of the brown show through as older, weathered rust.

How to Paint an Ork Truck Step 2

Step 3: Metal Dry-brush.

Here is where I took my large dry brush and Runefang Steel and dry brushed the whole model. Using the big brush not only helped paint the model faster, but purposely didn’t let me paint the cracks and crevices that a smaller brush would have allowed. I use Runefang since I will be adding washes and I want the model to be a bit brighter than using Leadbeltcher.

How to Paint an Ork Truck Step 3

Step 4: Fill in Colors.

here is where I will take the base coat of the various color panels and block them in. Evil Sunz Scarlet for the red, Macragge for the blue, and Averland Sunset for the yellow. The checkered areas where also painted white and the cloth wrapping with Ushabti Bone.

How to Paint an Ork Truck Step 4

Step 5: The Almighty Wash.

Taking a big brush and Vallejo Dark Brown Wash, everything received some love. While most of my paints are GW, I found the Vallejo washes to be much more economical and excellent alternatives to my much used Earthshade. Everything from my Orks to my Iron Warriors receive a dark brown wash.

How to Paint an Ork Truck Step 6

Step 6: The Crew Base-coat.

Meanwhile, the crew is also receiving their base coat. While I hit the metal areas with the same rust and metal dry brush, it was clearly not to the same level, but I figured that the details of the orks themselves would overshadow that.

How to Paint an Ork Truck Step 7

Step 7: Crew Receives Its Wash.

Here you can see both trukk crews getting their wash. I painted both trukks at the same time to make it quicker.

How to Paint an Ork Truck Step 8

Step 8: Crew Details.

I then did all the layers on the crew, tires, and wrecking ball. The metal areas received an edge of Runefang, the green skin was highlighted with Warboss then Moot Green. The cloth areas were re-highlighted with Ushabti Bone, and the black leather with Warpfield gray.

How to Paint an Ork Truck Step 9

Final Look: Detail All the Things!

Likewise to the crew above, the rest of the model received highlights. Metal edges were re-dry brushed, red highlighted with Wild Rider, yellow with Flash Gitz, and blue with Teclis. The checkers were also filled in with black, then cleaned up with white. Finally all the crew and wheel pieces were added back in with super glue.

How to Paint Ork Trukk Final Step

The final piece has that nice rusty, but characterful look I was after, but with relatively few steps, and minimal highlighting/layering – which is what is killing my on my Mentor Legion.

I hope this step-by-step was helpful to you in one way or another, and if so, please leave me a comment below or hit one of the share buttons, I greatly appreciate it!