Latest Posts

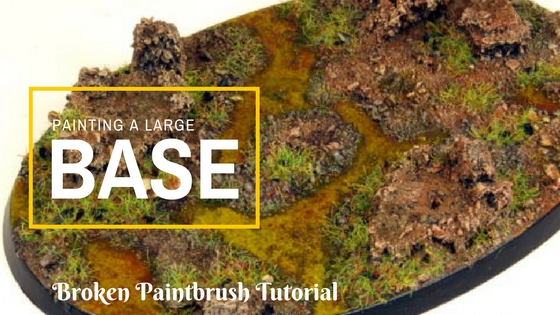
How to Paint a Large Base

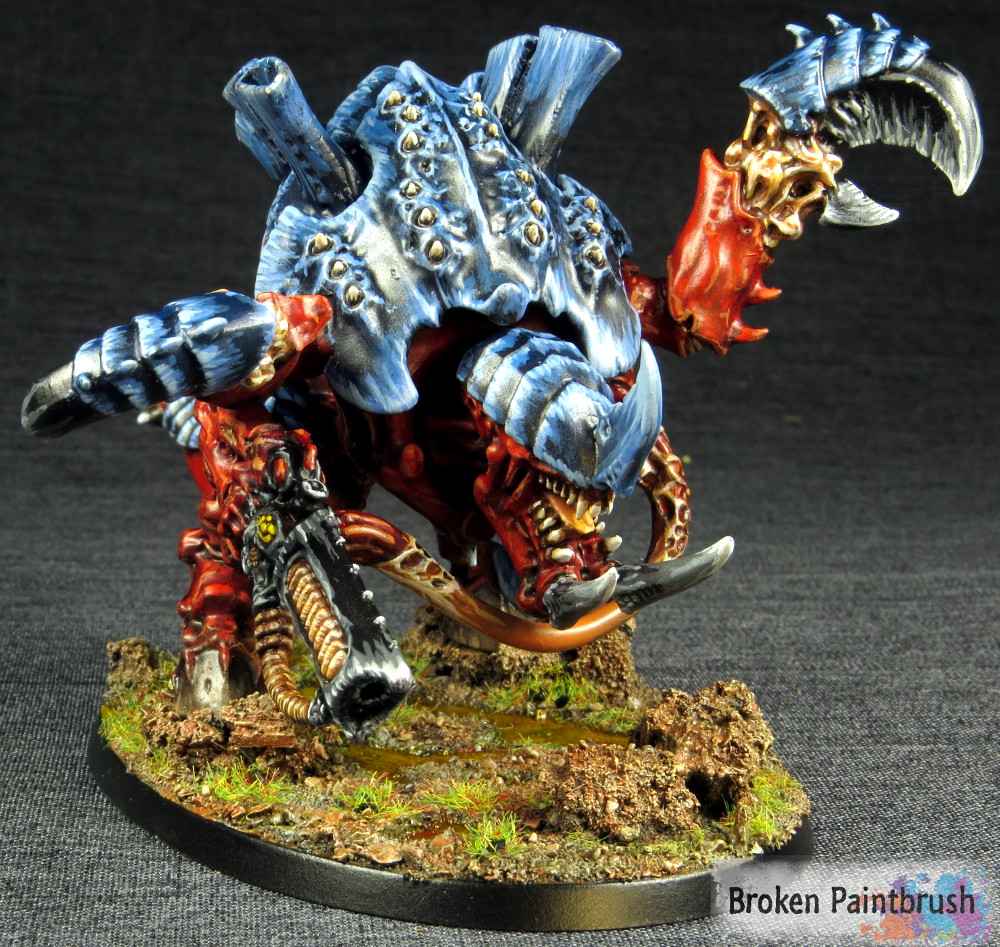
Painting a Large Base for the Tyranid Carnifex

Another exciting tutorial for your reading and learning pleasure. This time I go through the steps of painting a large base, in particular, the large oval base the Games Workshop provided in the Deathstorm box set for the Tyranid Carnifex.

Painting a Large Base Tutorial

So, unfortunately, I didn’t grab a before paint shot, but I used an old cork coaster to create some rock clusters around the base, including two that I planned to have the Carnifex mounted on. I then applied the great Elmer’s Glue in large splotches to apply the rest of the rock texture. I intentionally left a few areas bare of grit to create water areas.

Painting the Base Layers

The base was then primed with the rest of the models before given a nice heavy coat of Steel Legion Drab. A dry brush of Skrag Brown and then Ushabti Bone followed suit to provide the rock areas with a nice verity of colors and textures.

The idea is to leave some of the base colors a bit thicker in some areas than others. The water areas were based with a few thinned coats of Ogryn Camo.

Painting a Large Base step 1

Using Powders

Here is where the fun begins!

After learning about using my Flow Aid for powders, I immediately put it to practice. Along the edge between the rock/dirt and the water, I used Forge World’s Fresh Mud to create a wet earth look. The rest of the rock areas received splotches of Orange Rust, Grey Ash, Dark Sand, and even Faded Green powders.

The flow aid was used to spread the powders in place while preventing them from becoming an overwhelming mess.

Painting a Large Base step 2

Painting The Murky Water

The watery areas then received a nice covering of Vallejo Dark Yellow Wash thinned down with Airbrush Medium. Some of the stray powders from the rocky areas were left in the water before the wash which added some nice variation to the water and tied in the colors. The wash was also ‘pushed’ into the darker edges to blend them in a bit as well.

Painting a Large Base step 3

Final Details

After the wash was dried the base was given a couple of coats of matte varnish to seal in the powders.

Ushabti Bone was then broken back out for a final, light dry brush over the rocky textures which not only lightened the tops of the mud areas but cleaned up areas that received a bit too much powder.

The rim was also given its first layer of ‘cleanup’ black which I like to save to last to help me see that it is nearly finished.

Painting a Large Base step 4

Static grass was then added in small patches to add a bit of greenery. Once the glued dried another layer of black is applied to the rim to give it a nice, even coat, and another matte varnish is applied to seal it all together.

Painting a Large Base step 5

Since the base is now a nice, matte finish the water no longer has that nice shimmer. To fix this situation a couple layers of ‘Ard Coat was added to both improve the depth of the water layer as well as add that gloss look to it.

Painting a Large Base step 6

Mounting the Carnifex

As you can see here, the feet of the Carnifex included nails that had corresponding holes in the base to pin it in place.

This is important if gluing a model to a soft material like the cork as the glue has very little to hold onto and will easily break off. The nails also allowed the Carnifex to be stuck into wine corks to paint.

Painting a Large Base step 7

To help support the nails through the thin base, I added a couple of pieces of plastic card to create a thicker area for the nails to grab onto.

Painting a Large Base step 8

Showcase

And now the finished piece.

Painting a Large Base Finished

I hope this tutorial has helped inspire you in some way or provided a tidbit you can bring to your own bases. While they may not be as exciting as the model standing on top, the base can easily make or break a lovely model. Let me know what you think of this tutorial or my basing technique in the comments below, I would love to hear from you.
Canvas - learn to paint Finished

Canvas – or a New Painting Experience

So while I am still working on the whole move thing and haven’t set up my desk, the Mrs. and I went to a local paint-and-sip called Canvas. For those who haven’t heard of these, they are a mix of group painting lessons and drinking.

Canvas - learn to paint Mrs

For both of us this was the first time painting on a full-on canvas and I must admit, it was a bit intimidating to think we would paint anything like their examples in only 2 hours. Its crazy to think after all the models I have painted that creating something on an empty white sheet would be so different, but there is just something about it that makes it so very different.

The instructor/artist was great though. She took us through each step with examples of the specific colors and style to use.

Canvas - learn to paint WIP 1

The painting we were doing was called ‘The Storm’ and the very first thing we did to take the virginity of the canvas was a nice large area of blue for the sky. Whites were mixed in on the right, while purples and blacks were added to the lower left.

Canvas - learn to paint WIP 2

A nice purple road was added to the middle with the basis for grass on one side and flowers/burning bushes on the other. I really got in the spirit of it all and added more colors and variations in each section as I went.

Canvas - learn to paint WIP 3

Fall tree colors were added to the right edge and the main trunks lined in. I think best aspect of the processes was that we didn’t have to be clean or exact, in fact the messier we made each piece, the better it seemed to look.

Canvas - learn to paint WIP 4

Along that line, small green specs were added to the left trees for abstract leaves, while fall colors were added in larger blocks on the right.

Canvas - learn to paint Finished

And finally we added a bit of bushes along the sides and a nice bench to enjoy the scene. Clearly my perceptive skills need a bit of work, but not too bad for my first ever ‘real’ painting.

Canvas - learn to paint Mrs Complete

It was great to see how every one else interrupted the directions and made the piece their own. The picture above is my wife’s finished piece which also turned out great – and she isn’t even the painter!

So if any of you are looking to try out a larger scale painting, or a great date idea. Look for a paint and sip shop nearby, they seem to be popping up all over the place.`

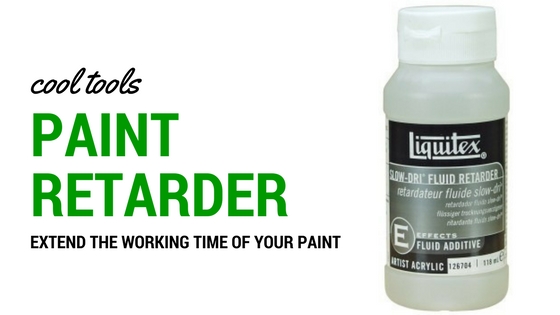
Liquitex Acrylic Paint Retarder

Cool Tools: Acrylic Paint Retarder

Following up on the importance of thinning your paints with airbrush medium, how do you keep the paints wet long enough to work on a large project? I was struggling with this on a hot summer day a few years back and posed that same question to my readers. The two solutions that were provided was a wet pallet and paint retarder.

Liquitex Acrylic Paint Retarder

Today I use both options, the wet pallet if I’m painting at the desk or doing blending and the paint retarder when using a standard pallet on the couch.

You add a drop or two to your mix and it significant increases the drying time of the paint. This keeps the paint on the pallet usable for longer stints without having to rewet the paint.

Liquitex Acrylic Paint Retarder

I have also used it to help with wet blending – though admittedly I am still working on this skill. Since the drying time is increased, you have more time to add the additional colors and work them together.

A bottle of the Liquitex brand is only $10 on Amazon for a 4oz bottle. While this may seem like a lot for the convenience of keeping the paint wet longer, it has more than paid for itself by not having to get more paint out of the pot when the first batch dried.

How about any of you, have you used paint retarder to good effect or have had issues using it?

Tyranid Warriors Banner

Tyranid Warriors of Hive Fleet Behemoth

Next up from the Deathstorm box is the three Tyranid Warriors.

Tyranid Warriors Banner

This is the second Tyranid Warriors brood that I’ve painted, with the first being armed with scything talons and death spitters, I decided to give this squad a venom cannon and devourers for shooting, and bone swords and lash whips for close range.

Tyranid Warriors of Hive Fleet Behemoth

I really like the new Tyranid Warriors kit with all the great weapon options, it was actually a bit difficult to decide on what to go with. I liked the idea of the bone swords for marine killingness and the lash whips give an interesting look as well. The devourers were just because they looked cool and were different from the death spitters in the other squad.

Tyranid Warriors of Hive Fleet Behemoth

I based these just like the Carnifex, using bark to add some rock formations and leaving bare spots on the base for water areas. I think it adds a nice green organic contrast to the alien blue and red. It also helped that the bases used in the Deathstorm box were a bit bigger than the typical based given in the kit.

Tyranid Warriors of Hive Fleet Behemoth

I also took a bunch of in progress picture for these guys with the thought of a step-by-step but am not sure if it would give much more than the Carnifex tutorial, perhaps I’ll get around to editing down the 54 pictures into something meaningful for you all.

Tyranid Warriors of Hive Fleet Behemoth

Like I said, the new kits are a great step up from the old kit, which in itself wasn’t bad, but the expanded weapon options are really nice.

As always, let me know what you think in the comments below.

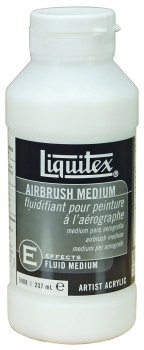
Liquitex Airbrush Medium

Cool Tools: Airbrush Medium

Cool Tools Airbrush Medium

One of the tips that nearly every Intro to Painting starts with is: thin your paints. It makes sense, the paint pots are fairly thick for one reason or another and painting straight onto your mini can create a thick coat, covering fine details. So what does everyone do? They add a drop or two of water, stir it in and make it work.

When GW introduced the Lahmian Medium technical paint it opened a whole new world for me in terms of thinning paints, without making them watery. Adding a bit of medium would dilute the pigment a bit, but wouldn’t turn the paint into a watery, uncontrollable soupy mess. After using up my first pot of the medium I released that $4 for a little little 12ml bottle would quickly kill my painting budget.

I then found a bottle of acrylic matte medium at a local painting store and thought I hit the jackpot. It only cost a few bottles of Lahmian but was way bigger. I quickly realized though that artist matte medium is very thick, and left on its own will dried into a sticky mess. This made the twist-top bottle cap almost unopenable (yes I had to resort to the wrench a few time).

Liquitex Airbrush MediumSo the next time I went to go look for an alternative, I found Liquitex’s Airbrush Medium. Not only was this in a flip-top bottle (no more wrench) but it was much thinner than the matte medium. So when I’m painting on normal layers, I just add a drop or two you my pallet and mix it in without any extra water. This thins the paints done a bit but keeps a nice paint constancy.

Obviously, from the name of the product, it is meant for airbrushing, and while I haven’t used it yet for this purpose, I could see why. I know that when thinning GW’s paints with 50-60% water to allow it to be airbrushed, it often comes out so watery that it just pools and drips (that and I am not a great airbrusher yet) but I feel that using some of this instead would not only allow it to be airbrushed, but also keep it from running a muck.

For those on the budget hobby, you can get Liquitex’s Airbrush Medium for only $14 for a 237 ml bottle on Amazon. So this while it is 3 and 1/2 times the cost of one bottle of GW’s medium, you are getting nearly 20 times as much product, meaning you will probably never run out unless you are working on some big projects.

How about you guys? Have you used the airbrush medium and found it helpful or awful? How about other medium products that have helped your paint thinning (or even thickening). Hit up the comments below.

  • Joe B.

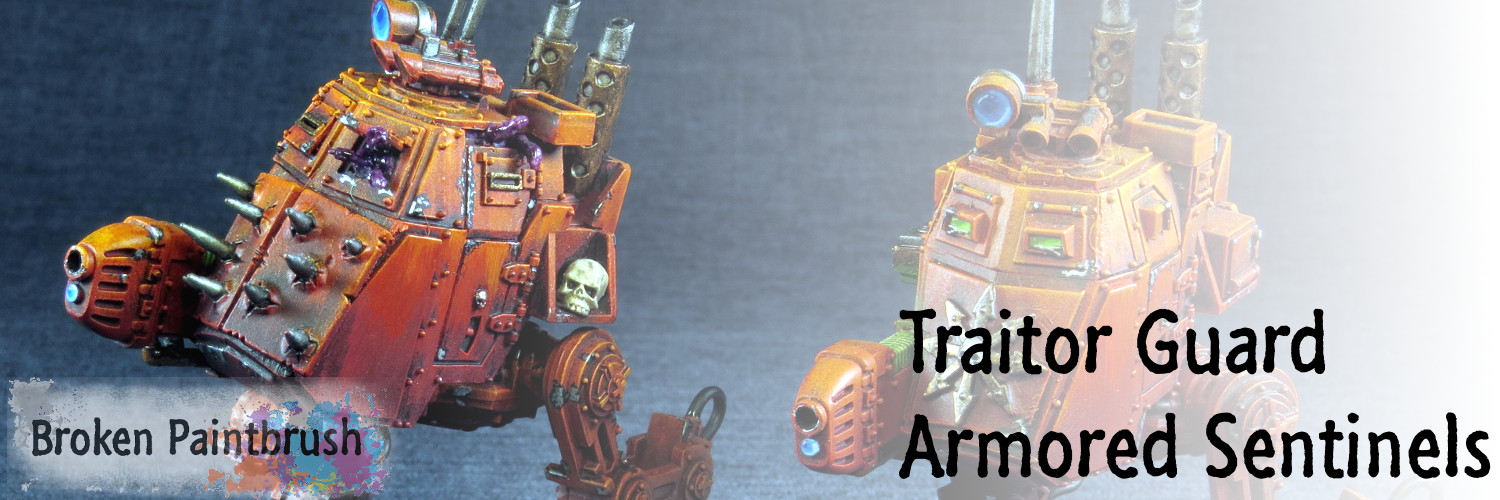
Traitor Guard Armored Sentinel Squad

Traitor Guard Armored Sentinel

I admit it, I’m a tread head and a star wars geek, so when I was building up my Traitor Guard, not only did I fill it with a bunch of tanks, but had to add at least a couple of Sentinels. So here is my Traitor Guard Armored Sentinel squad armed with plasma cannons.

Traitor Guard Armored Sentinel Squad

I built up the bases using extra bits and sprue then filled in the bumps with plaster with a final layer of gravel on top. Conversions were fairly simple. The eagles on the front were cut off, and a chaos star was bent around the front of one and two Chaos Vehicle plates were added to the front of the other. With a bit of green stuff, I also added a bit of demonic presence to the one.

With a bit of green stuff, I also added a bit of demonic presence to the one.

Traitor Guard Armored Sentinels WIP

Since sentinels are a bit taller than the tanks, the orange to red transition was a bit longer and by the time it got to the feet, they were pretty dark red. To give them some definition I dusted the edges with the layer coats of the base for weathering.

Traitor Guard Armored Sentinel Back

I also magnetized the weapons, but in hindsite, it was a silly thing to do since the plasma glow was spread onto the actual hull – can’t really magnetize that.

Traitor Guard Armored Sentinel

While the sentinels in games have always been a bit unpractical, I love the aggressive stance and look of the armored sentinels striding forward. I think because of this they often became an early target in games – sometimes more so than the bigger tanks.

Something about two angry looking plasma cannons – even if BS3 means they will often veer way off target more times than not.

Traitor Guard Armored Sentinel

Let me know what you guys think of my Traitor Guard Armored sentinels in the comments below. You can see more of the army at the Traitor Guard Army Page.

Good Reads 5 – Panther, Rivers, Thunder Priest, and Fists

Welcome to Good Reads 5 where I highlight some of the Hobby Blogs from around the interwebs that caught my eye.

Good Reads 5

One of the things I love about our corner of the internet is that we hobby bloggers look at each other as companions in this journey and spur each other on. It is hard to find that anywhere else, so keep up the great work hobby bloggers, #warmongers, and readers alike!

Chaos Panther Beast

Chaos Panther Beast by TG Atwell

Built by TG Atwell at Dark Future Games

What happens when you combine the Glotkin, Maulerfiend, and a ton of green stuff? Well TG over at Dark Future Games made a crazy wicked Chaos Panther. Over the course of five or six posts, TG documented his progress from a pile of bits and a creative idea, into a very unique and inspiring conversion. Hopefully we see it painted soon TG!

Improving Premade Rivers

Repainted rivers by John Stiening

Painted by John Stiening

So John Stiening over at 40k Hobby Blog showed how you can take pre-painted river sections you can pick up for $18 on Amazon, and re-paint them into much more realistic terrain pieces. With just a few simple steps (like 4) he took a cartoony river of blue stuff and made a muddy, toxic-almost stream for your armies to fight over.

Iron Priest on Thunderwolf

Iron Priest on Thunder Wolf by NafNaf

Converted by NafNaf

I must admit, in the crazy world of 40k, I think the wolves-riding-wolves is plain silly, even more so lead by a wolf riding a floating wolf chariot, but that’s me. NafNaf, on the other hand, is making a whole army of Thunderwolves and wanted to add in an Iron Priest to fill a missing hole in GW’s product line. His conversion came out superb kitbashing Harald Deathwolf and a techmarine. Thunder Priest ho!

Painting Imperial Fists

Imperial Fists by Mordian 7th

Painted by Mordian 7th

So Mordian7th is one of those painters who seem to be able to paint a whole army over a cup of tea (or perhaps a pint?). After finishing his nice Heresy Era Thousand Sons, he switched sides to make some Imperial Fists. It was only a week or so ago he posted up his paint recipe for a typically challenge color and now has nearly finished his first 20-man tactical squad.

Wrap Up

Did you see a post that you think I missed? Hit up the comments below and share it with us, the hobby blog world is huge and I know that I am not only missing out on many great blogs, but it can be difficult to keep up and choose only a few for these posts.

Decurion Detachments for All – Good or Bad?

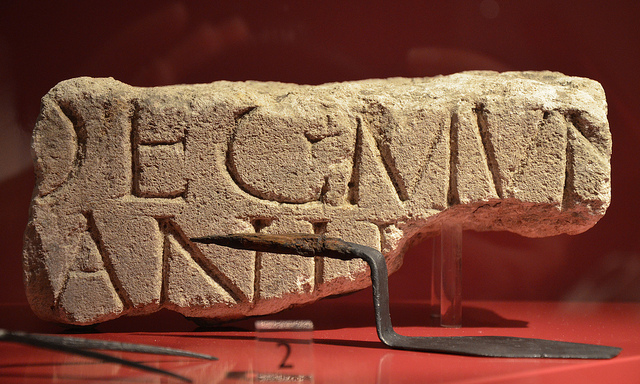
Decurion Stone Picture by Carole Raddato on Flickr

Decurion Stone Picture by Carole Raddato on Flickr

While I don’t buy into all the rumor mill that is a constant buzz online, Faeit 212 has a post rumoring about all future codex will have decurion like formations forcing people to buy “tax” models. It may never come to pass, but it got me thinking, is this a bad thing?

A Decurion?

Necron Army by achrntatrps

Necron Army by achrntatrps on Flickr

A quick catch-up for those who did not buy the Necron Codex, the Decurion Detachment is a super FOC in the sense you need one ‘core’ choice and at least one to ten ‘Auxiliary’ choices. There is also a single ‘Command’ choice that can be added. For most of these choices it is actually a formation or units that have their own formation rules and when built into a Decurion Detachment gain an additional bonus.


//

In the Necron case, the Core is the Reclamation Legion made up of an Overlord, Warriors, Immortals, and at least one unit of Tomb Blades. Lychguard and Monoliths can be thrown in as well, but it is ‘tax’ of the Tomb Blades that seem to get people up in arms on the apparent problem with the Detachment. The rest of the units from the codex fall into ten different formations. When you have a legal Decurion Detachment all your Necron robots have a better chance of passing their Ever-living save – a crazy good bonus.

Ok, so let us take a look at why this may good or bad idea for other armies from some different vantage points.

The Business View

To start with, no I am not a GW employee nor have I ever worked with any affiliate company of GW – just to get the haters out of the way.

By Bud Caddell on Flickr

By Bud Caddell on Flickr

So pretty much anytime GW changes something from revising a codex or releasing a new dataslate, a piss-storm of people on the interwebs lash out at GW for being a money bags. But let’s get real, Games Workshop is a company, much like the ones we all go to work for and allow us to pay for food, shelter, and afford a luxury hobby like Warhammer. So, yes, everything GW does needs to make business sense or their staff would need other jobs and all those cool kits we’ve been waiting for ever to see, won’t come to pass – that doesn’t mean though that they don’t care about the hobbyest and gamers, just check out the sections below on those points.

Now, why would the business side of GW like the idea of Decurion-style formations in future Codex releases? Well, as the Faeit 212 article pointed out, it can squeeze in a few ‘tax’ units that may not normally get a lot of sales such as the tomb blades. You may also need to buy a few more units to fill in the ranks, such as the two Warrior units and a unit of Immortals.

The other thing it does, is incentivise customers to fill in a few gaps from their existing collection to create a few of the other formations. Much like the formations of Apocalypse, these formations have specific unit requirements that provide a benefit to the whole. If you only have one Doom Scythe for example, you would need to buy a second to complete the Deathbringer Flight formation. This is nothing different than other stores telling you if you just buy one more, you will save on all the items.

The story view

Now we come to the fluff standpoint, or that of the hobbyist, the collector, and the reader/writer. The Decurion Detachment gave the Necron army its own look and feel for how it would operate. Sure, the core is still built around a simple FOC HQ, three troops, and a fast attack, but from their you can have extreme customization on where it goes.


//

This flexibility designed for the Necron army gives it a character of its own, separate from Space Marine Chapters, or Imperial Guard formations. This has great potential for other armies that act much differently than the traditional FOC. In the past GW attempted to do this buy giving HQ characters the ability to make certain units ‘troop choices.’ While this solved the problem it was a bit forced and felt wonky – bikers are fast attack, but also troops?

Mentor Legion Army

Lets take the hypothetical Mentor Legion supplement (anyone at GW reading this, please make this a possibility!). Their original background is breaking apart squads and  ‘loaning’ them to other chapters. More recent background has them instead leading and working with Imperial Guard units (from the Cadre short story). So its core formation may include a Tactical Unit, Capitan, and an Imperial Guard squad with the special rule that the tactical squad could be broken up to lead the IG squads.

Think about your favorite army, its background, and how well that is represented in the FOC organization. Now what if GW created a Decurion-style formation that fit it better. Sure you may have to buy a unit or two that you wouldn’t have before – but most likely it was because it didn’t fit the FOC setup and clogged one of the vital slots like fast attack.

The gamer view

Now lets take it from the gamer’s viewpoint. I must admit this is probably my weakest viewpoint as I have only played a few games in the last few years and have never been a competitive gamer. I can, however, appreciate the new options laid out in the in the detachment.

For the power gamer, you could take the formations you think will just crush your opponent and spam them. There is no restriction on the number of each formation, only that you have one core and upto ten of the auxiliary. For example, if you think the Doomsday Ark is badass, you could take four or five of the Annihilation Nexus formations, each with two Annihilation Barges and blow the other army off the board – that’s 12 to 15 heavy support choices, normally reserved for an unbound list.

Decurion-style Conclusion

So first the cons:

  • You have to pay to play. It is true that if you want to take advantage of the Formation, you need to buy the models.
  • Harder to build up. You can’t really just add one or two units, most formations require a few specific units.
  • Not as flexible in the classic sense that you can pick only the models you like. Again, each formation needs a couple of different units to make it happen.

Now the pros:

  • Creates a unique army style that fits the story background without feeling forced.
  • More flexibility in the sense you aren’t limited to 3 FOC slots
  • Special rules, the Ever-living could be game changing
  • A chance/excuse to buy/play with units that you may have passed up before

The biggest thing to remember about the Decurion Detachment, is that it doesn’t replace the Battle Forged FOC Detachment, or even prevent unbound Necron armies. If you don’t like the detachment, don’t use it. With that in mind I think that the specialized detachments for all armies going forward is a fantastic idea. It will add more flexibility, opportunity, and background perspective to the hobby.

Games Workshop has finally broken free of the standard HQ, Troops, etc. and allowing each faction to play and feel how they created them. I look forward to actual Tau Hunter Cadres, Iron Warriors Grand Companies, and Ork Dreadmobs all having their own full on detachments.

How to Paint a Carnifex Finished

Getting to Happy Painting Tutorial – How to Paint a Carnifex of Hive Fleet Behemoth

I have put together my step-by-step tutorial on How To Paint a Carnifex, in my case one of Hive Fleet Behemoth. For the finished gallery, check out the post here. This Behemoth painting guide would be helpful for any Tyranid monstrous creature.

Paint a carnifex banner

Step 1 – Prime

I’ve gone back and forth on my projects between black primer, white primer, and even tried brown. What I have settled on is a good black coat with an upper dusting of white. This leaves all the recesses dark (which helps with painting those pesky nooks) but provides a subtle shadow/highlight to the base coats. The dusting also emphasizes the details which make it easier to apply the base colors.

How to Paint a Carnifex primer

The Base Coats

Step 2 – Base Red

For the Tyranids, I used my spray gun to give a nice coverage of Mephiston Red to all the skin areas. This saves a lot of time not having to paint them by hand. I also chose red over the base blue of the carapace because the blue covers red much easier than red trying to cover blue – something to do with the pigments.

How to Paint a Carnifex Base Red

Step 3 – Block In

The next step is to go back with the brush and block in the rest of the primary colors. Here I used Necron Abyss for the blue, Abaddon Black for the black, and Ratskin Flesh for the non-red flesh. You can also see that I kept this beast off of his base because it can be so darn tricky to get those underbelly parts. So the feet have nails pinned in place and used half-corks to provide a working stand. The base was painted separately (with a tutorial here).

How to Paint a Carnifex Base Coats

Step 4 – The Almighty Wash

Here is why I love the blocking in technique: washes. I have been using Vallejo Dark Brown [Amazon] and am loving it. For some, this could be considered game-ready with maybe just a few of the remaining steps.

I also did a follow-on wash of black over the carapace to darken it a bit more.

How to Paint a Carnifex Brown Wash

The Fleshy Areas

Step 5 – First Red Highlight

I then started working on the red using Evil Sunz Scarlet to create the first layer of highlights. This also cleans up the wash a bit as it does tend to pool at times.

How to Paint a Carnifex Red Layer 1

Step 6 – Red Edge and Flesh Highlight

I then did a final highlight of Ratskin Flesh for the red to create a strong contrast. When highlighting red it is much better to move to more fleshy colors rather than trying to add white; it just moves it towards pink.

While I had the Ratskin out, I went back over the lighter flesh areas to re-create the base color, leaving the darker shades in the recesses.

How to Paint a Carnifex red 2

Step 7 – Fleshy Highlights

Ungor Flesh was then used to highlight flesh areas. I also used it for the first layer of the teeth as well as the vent areas of the red skin.

How to Paint a Carnifex Red 3

Step 8 – Final Flesh Highlights

I then used Pallid Wych Flesh to do a final highlight on the flesh. This creates a nice strong contrast to the dark red around it. Not shown here is the final step of doing some back-lining of dark brown wash only in the recesses. This was especially important around the teeth and venting, but I also used it where the light flesh meets the more shaded areas to create more separation.

How to Paint a Carnifex Flesh highlights

The Blue Carapace

Step 9 – The First Blue

I then started working on the blue highlights of the carapace. The first layer was Caledor Sky. You’ll notice that here I am no longer doing edge highlights or any blending, but rather more of a sharp streak. This is to create a beetle-like look on the hard armor.

How to Paint a Carnifex Blue 1

Step 10 – The Blue Mid-tones

The second layer of blue highlights used Calgar Blue. Again keeping with more a streak look and kept inside the Caledor layer. The streaks were done by starting the brush against the edge and pulling it towards the inside edge, tapering along the way.

How to Paint a Carnifex Blue 2

Step 11 – The Final Blue Highlight

The sharp highlight on the blue used Fernisian Grey and was kept mostly towards the sharp edges. On the Hive Tyrant, I applied a final layer of full-on white but decided not to go so extreme on the non-character model here.

How to Paint a Carnifex Blue 3

The Black Weapons

Step 12 – Black Highlight

The weapons were given their first highlight of Mechanicus Standard Grey. These are done similar to the blue with some streaks but also using a bit of an edge highlight here as well.

How to Paint a Carnifex Black 1

Step 13 – Black Highlight

Applied next on the black was Administratum Grey, again mostly on the edges and shorter streaks.

How to Paint a Carnifex black 2

Step 14 – Final Black and The Base

The final black layer is a small amount of Ceramite White along the hard edges. I also placed the Carnifex on the WIP base to see how it is coming together. The base had holes drilled to allow the nails to fit through with some extra plastic card underneath for additional support.

How to Paint a Carnifex base

Step 15 – The Eyes

Yriel Yellow was used for the base coat of the eyes as it has a good coverage factor. I then added Flash Gitz Yellow as I like the look better as it’s much more vibrant. The Vallejo Dark Brown Wash was again used to back line in the eye rim and between the weapon’s eye nodes. I also used the wash to add a tiny sliver down the center of the eye to create an iris.

How to Paint a Carnifex Eye

Step 16 – Final Steps and Complete

Some of the final steps included going back to the carapace spines and painting them as the teeth as well as touch ups to the blue and reds where the brush nicked the wrong color. The base was also completed separately and then glued in place.

How to Paint a Carnifex Finished

I hope you enjoyed my tutorial on how to paint a Carnifex if you want to check out more of my tutorials, click the ‘Tutorials’ link at the top.


Good Reads 4

Good Reads – Hobby Blogs You May Have Missed – 2015W13

With the end of another week comes Good Reads 4 with hobby blogs that I have come across the last week or so. I’ve just recently jumped into the Twitter world of #warmongers, but it has significantly expanded my eyes into the world of blogs. If you are on Twitter, hit me up at @brknpaintbrush.

Good Reads 4


Green Stuff Creations

Green Stuff Industries

Built and painted by Green Stuff Industries

Green Stuff Industries shows off where to find some cool bits for Chaos Space Marines and why he is passionate about converting/bit bashing. Many of his kits are non-GW, or at least not Chaos Space Marine specific. Check out some of his cool creations.

Renegades

chaos renegades by Elotsip 40k

Built by Elotsip 40k

Just like many of us, Elotsip 40k needs more Renegade troopers, so he shows us three new units bits bashed from multiple sources. Some of the bits used show how GW is missing some gaping holes in the renegade, traitor guard area and I have bookmarked a few of his sources for future projects.

Painting Eyes

Eye tutorial on Massive Voodoo

Eyes by Raffa of Massive Voodoo

The guys of Massive Voodoo always have great paintings and fantastic tutorials. This week Raffa gives a tutorial on painting realistic eyes, going so far as to drill out the pupil and add an acrylic lens – perhaps a bit too details for 28mm range, but cool.

Chipping Effect

Chipping Fluid

Chipping fluid is one of the techniques that I haven’t got to myself, but both Greggles and Tibbs shared their experiences. Greg had a good fortune, and the bright idea, to test on a spare tank hull first since he ended up scraping off too much and revealed the plastic underneath. He then took his learnings and did up a nicely worn Deff Dread (you might have seen in his billion photos of Adipticon).

Tibbs also shows us how he used the Chipping Fluid on his Knight Titan to great effect. He has an excellent write-up on the pros and cons of the Vallejo Chipping Medium he used and the importance of using an airbrush with it.

Dire Avenger

How to paint power Weapon by La Espada y Los Dados

Painted by Juan at La Espada y Los Dados

So there may be about a thousand posts on how to paint power weapons, but Juan at La Espada y Los Dados (The Sword and the Dice) is not only in Spanish, but used a Dire Avenger for his example. No habla Espanol? No worries, most modern browsers will translate for you if asked nicely and if not his pictures speak for themselves.

Wrap Up

Until next week!

Oh and I’ve been having off and on issues with Disqus comments below so if they aren’t loading for you could you send me a note on twitter or google plus? I’ve been trying to speed it up but want to make sure it is working for everyone. Thanks!


Fabius Bile painted up for the Iron Warriors

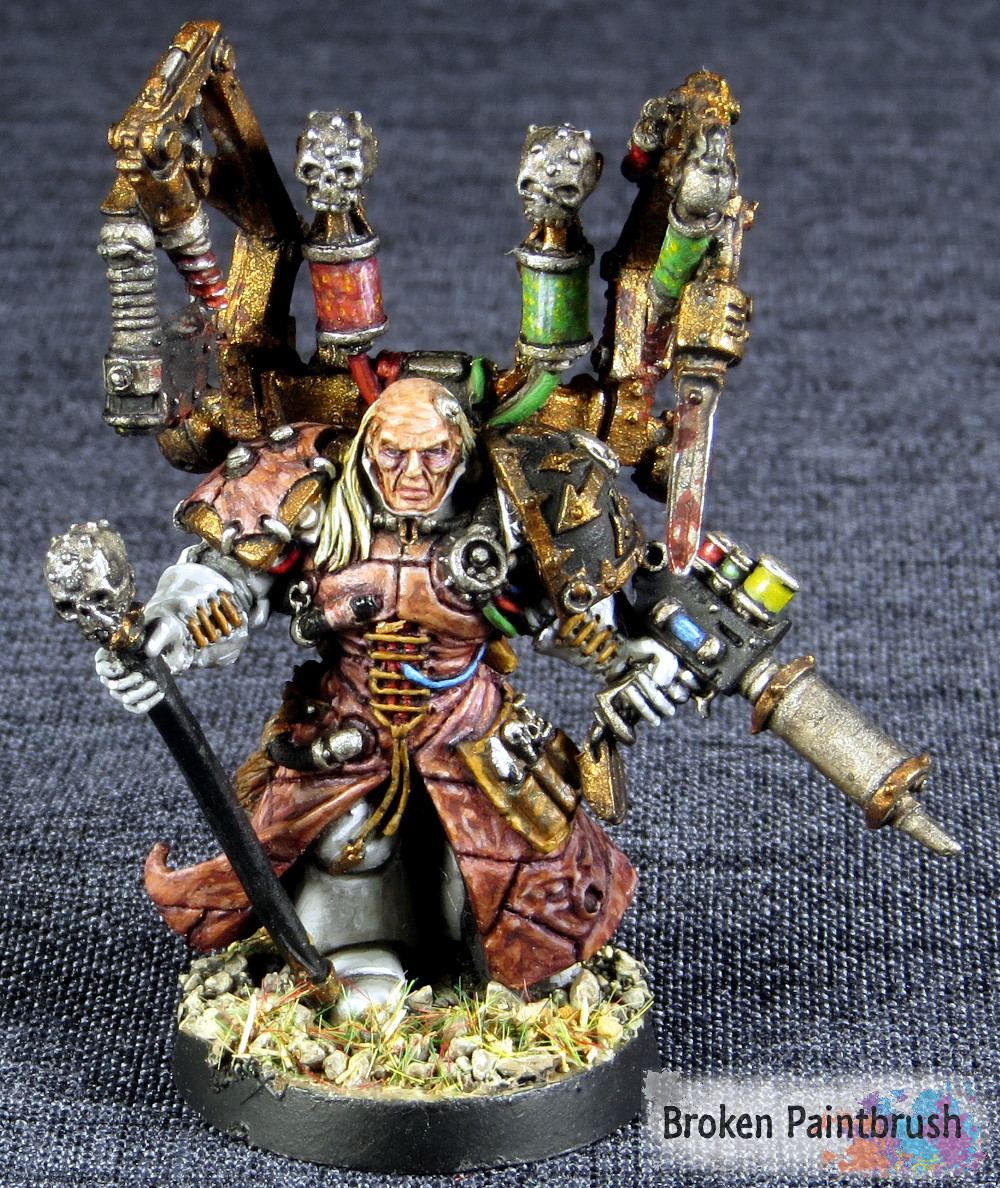
Fabius Bile – a Classic in Iron Warriors Style

Fabius Bile Banner

An oldie but a goody, Fabius Bile is a Games Workshop classic that I’ve had in my collection for over 15 years (crap that makes me sound old!). He has gone through a couple of iterations of paint schemes and his ‘enhanced’ warriors are back into bits pile in my closet, but I present the latest update to the classic.

Fabius Bile painted up for the Iron Warriors

I wanted to pay some homage to his origins as a Emperor’s Children apothecary but still fit in with my Iron Warriors 14th Grand Company, so the armor was painted a dirty white and the shoulder pads black and silver. The flayed skin robe helps create the morbid color offset by the brightly colorful vials.

Fabius Bile painted up for the Iron Warriors

I’ve seen Fabius Bile’s Chirurgeon used on so many crazy conversions for great reason: they are epicly gruesome. Between the chain blade, drill, butcher knife and syringe, it makes even a Ork Doc cringe. I wanted to give the backpack an old, worn look but still have it flashy as any Emperor’s Children would have it.

Fabius Bile painted up for the Iron Warriors

Game wise, the newest edition of the codex took some of the fun out of the Enhanced Warriors (any one remember the 3rd edition rules?) but 5 strength 5 attacks with instant death isn’t something to be sneezed at – even if his power armor and feel no pain won’t hold up against the monsters he would be great at killing.

I hope you like him and feel he does the classic some honor. As always, comments and suggestions are welcome!

  • Joe B.
Cool Tools Brush Soap to Restore Paint Brushes

Cool Tools: Brush Soap

I abuse my brushes. Yes, I admit it, I am a brush abuser. But fortunately, there is brush soap to save the day.

Cool Tools Brush Soap to Restore Paint Brushes

There are many ways in which I abuse my brush. From using too small of a brush to accomplish my painting to letting the paint dry on the bristles. Not only does using a detail brush slow my progress,  using it to cram color into areas would be easier with a larger brush.

With two little ones running around the house, it has been on more than one occasion that I didn’t fully clean the brush before chasing after them. Thankfully I found about brush soap a long time ago and has saved me way more than its cost in not having to buy as many new brushes.

The Masters Brush Cleaner

Brush Soap for painting

The most common brand of brush soap is The Masters Brush Cleaner which comes in a little plastic container. Inside is filled with a particular type of soap.

The small 2.5oz container is only $5 on Amazon and will last forever.  I bought mine almost ten years ago now and use it every time I paint and just now am I thinking I need to replace it.

Not only does the Brush Cleaner help remove paint from the bristles, but it also acts as a conditioner for the hairs. After all, ‘natural’ brushes are made from animal fur, and just like your hair, need to be shampooed. This conditioning keeps the bristles stay straight longer and less brittle.

How to Use Brush Soap

To use brush soap, wet your bristles and pull it across the soap, rolling the hairs as you go. Rinse it off and use a damp paper towel to rub the bristles. Repeat until the brush is nice and clean.

Using Brush Soap to clean a brush

So if you want to get serious in any way with your painting, consider picking up a container of brush soap. Either grab it on Amazon here or find it in your local art supply store. The soap has probably saved me at least ten times its cost in brushes (yeah I’m that bad on them).